Reading force measurement values from A&D’s LCCU-21 button load cell

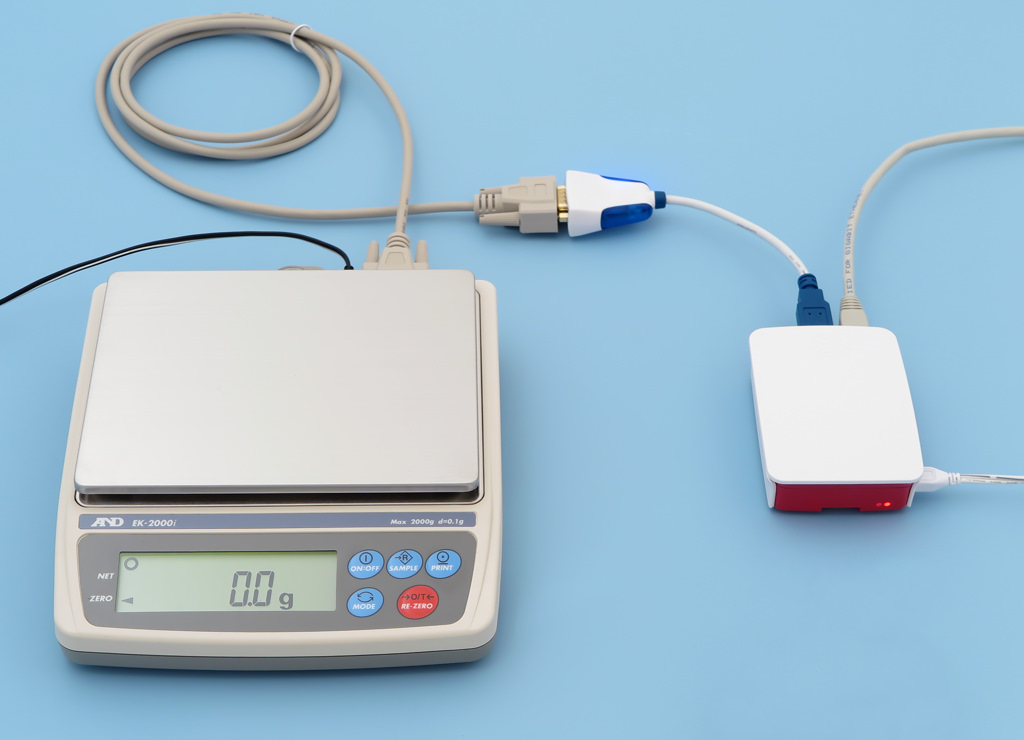
A&D’s LCCU-21 USB subminiature button load cells are available in capacities ranging from 100 N to 1 kN. Their tiny size makes it easy to incorporate them into your own machinery or test equipment. They are connected to an A/D converter with a USB interface, enabling you to quickly build PC-based force measurement and data acquisition systems at a very affordable price.

A&D LCCU21N100 usb button load cell

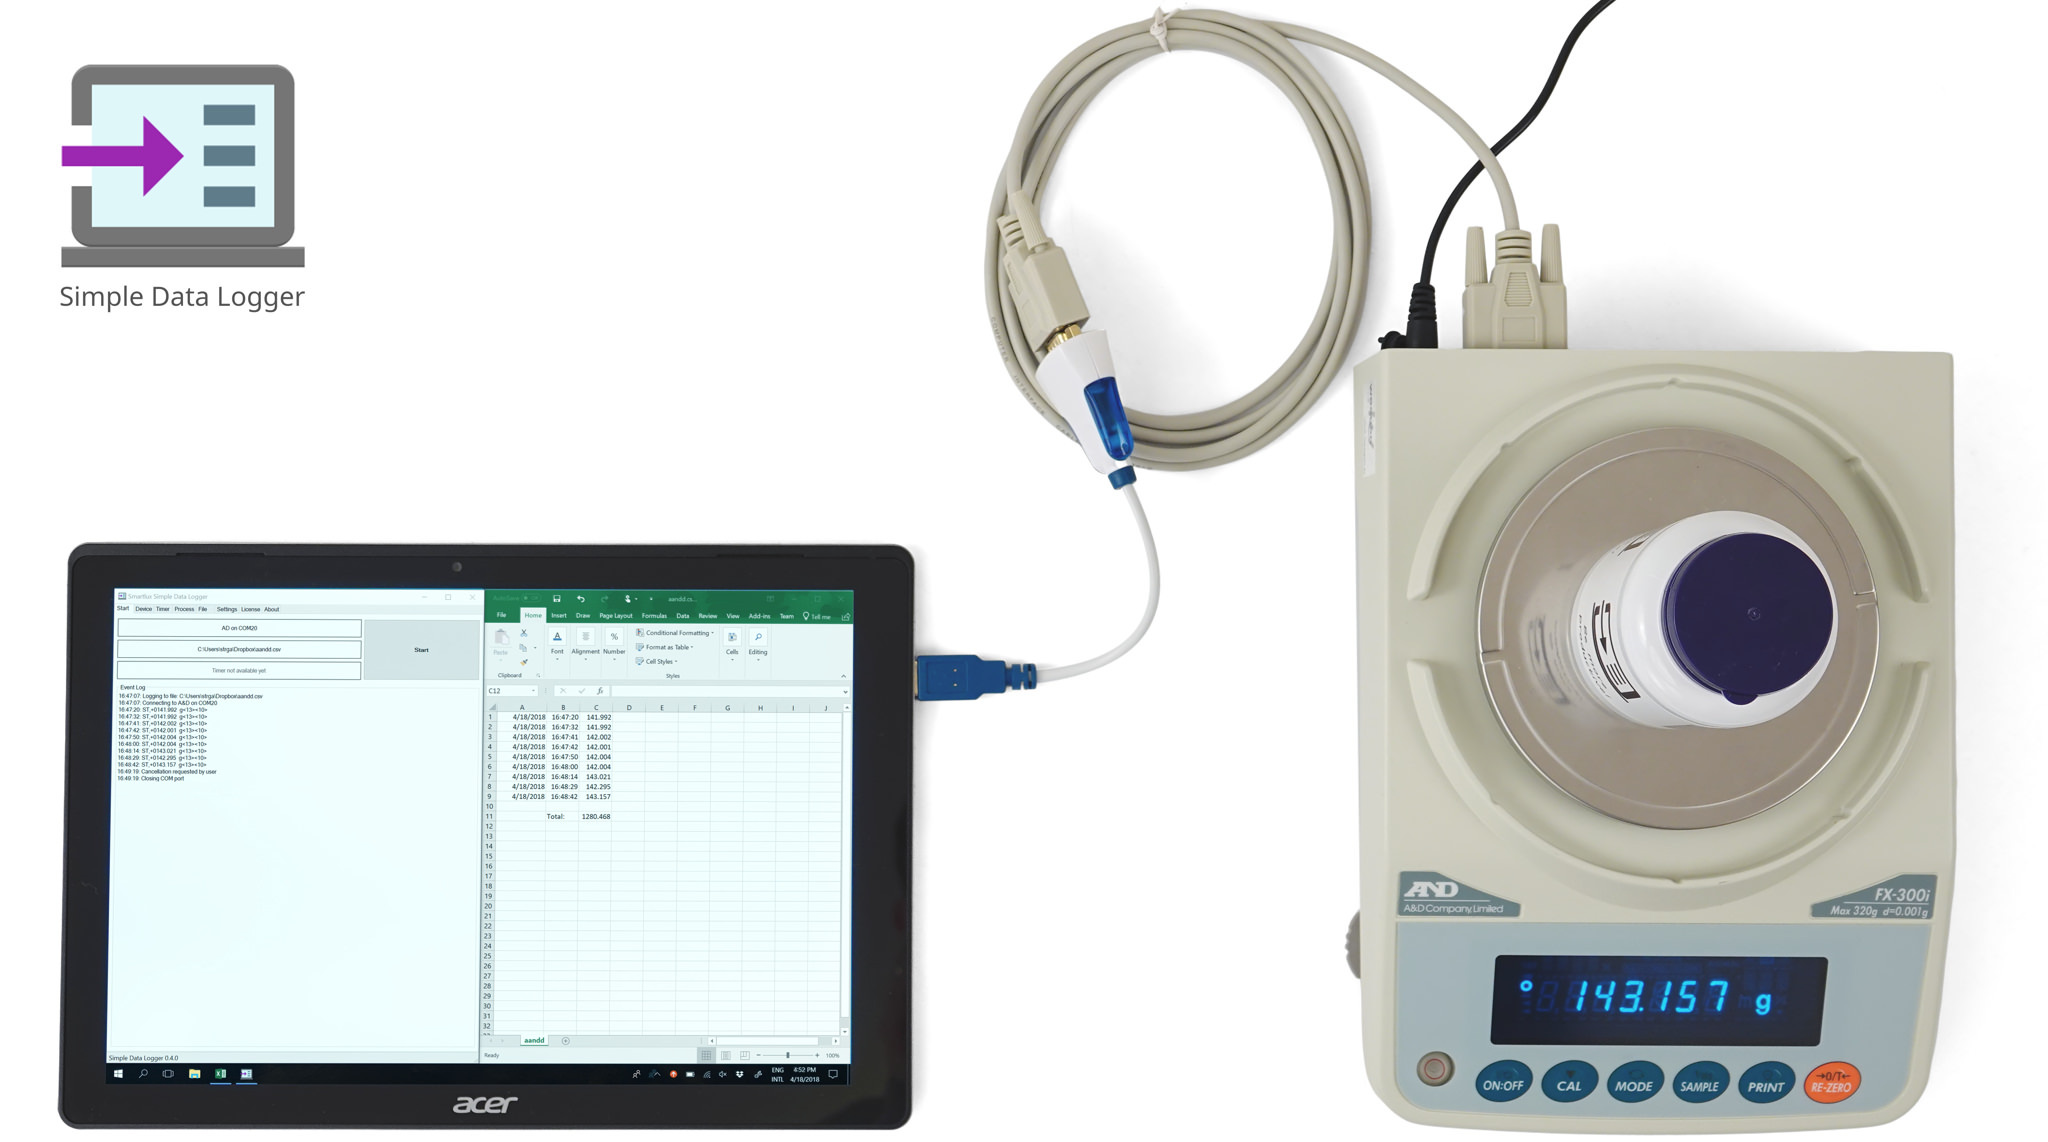
LCCU21 device profile in Simple Data Logger

As an alternative to A&D’s free WinCT-DLC application, you can also use these load cells with the most recent release of our Simple Data Logger software (SDL v1.2.1). In this article, I’ll show you how to configure SDL to request data from the load cell in user-defined intervals (polling).

The LCCU-21 button load cell has two data transfer modes: continuous transfer of up to 100 values/s and a command/reply mode. Currently, only the second mode is supported by Simple Data Logger (continuous mode has to be started and stopped by sending special commands to the LCCU-21, which is something that will be available in a future version of SDL).

Force measurement using A&D’s LCCU-21 button load cell and Simple Data Logger

1. Download and install Simple Data Logger.

2. Go to the license tab and enter a license key (required for the polling function). You can purchase license keys from FastSpring through a completely automated process (including a “90 days” license for only US$5). You can also contact us if you require a free trial license or apply to become a reseller if you want to sell our software to your customers.

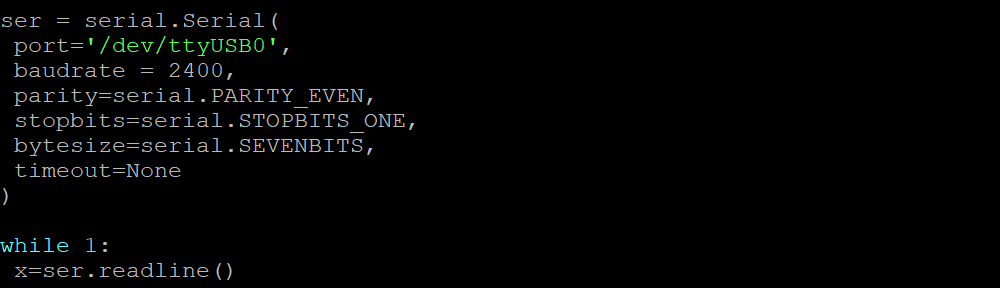
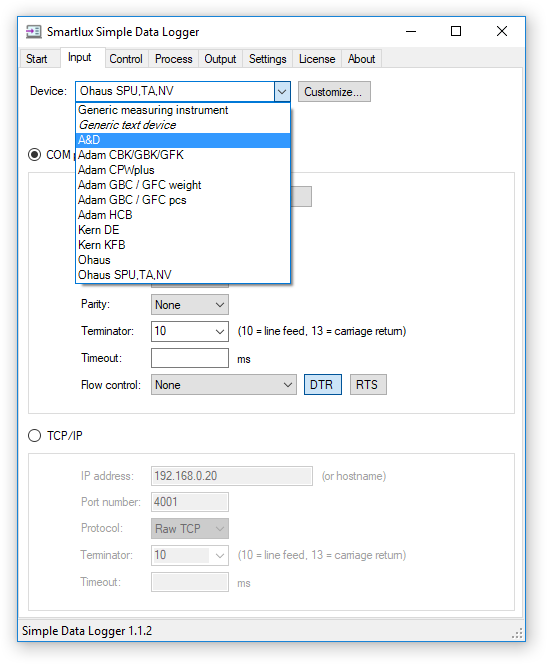
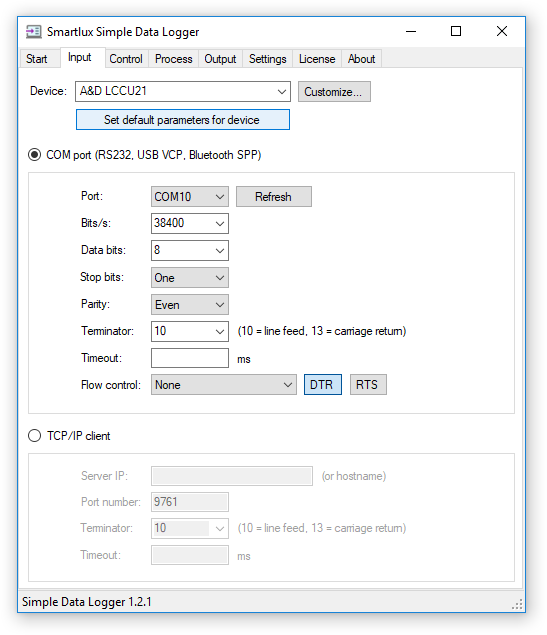
3. In the input tab, set the device to “A&D LCCU21”, then click on set default parameters for device. This will set all interface parameters for you. The only thing left to set is the (virtual) COM port which appeared on your PC after connecting the LCCU-21 to a USB port (see this PDF document for further information):
A&D LCCU-21 usb button load cell: configuration in input tab

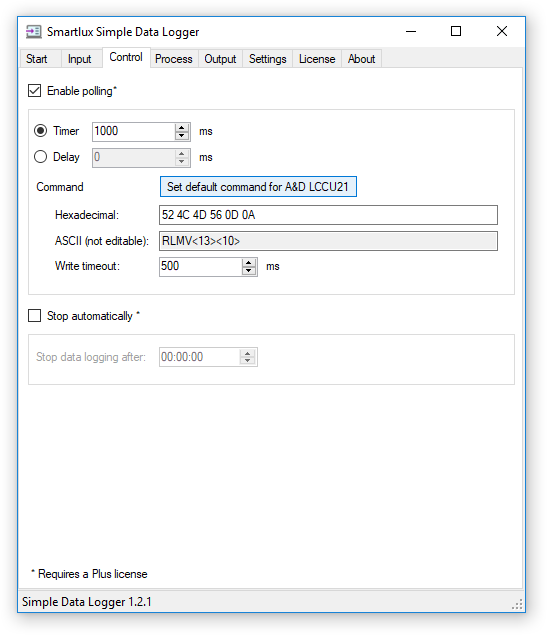
5. Switch to the control tab, enable polling and set the timer to a value that makes sense for your application. Click on set default command for A&D LCCU21; this will automatically enter the “RLMV” command which will be sent to the USB button load to request measurement data:
Set default command for A&D LCCU-21 usb button load cell

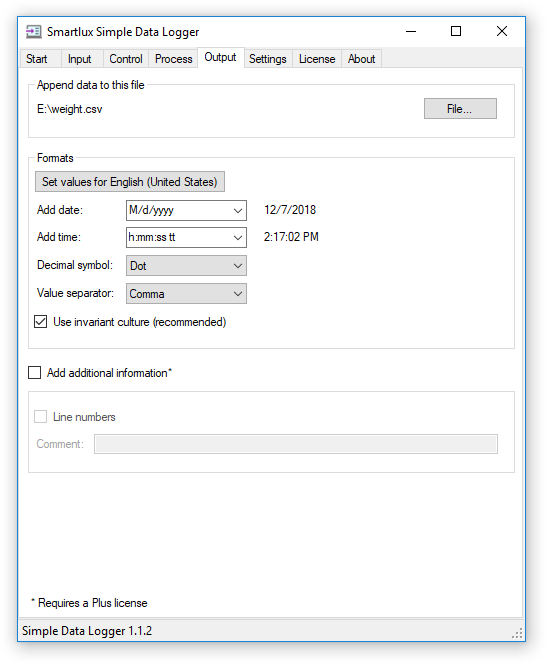
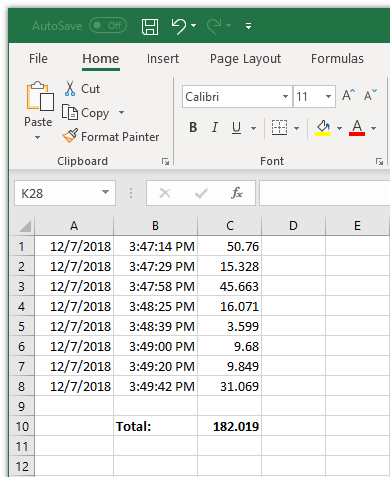
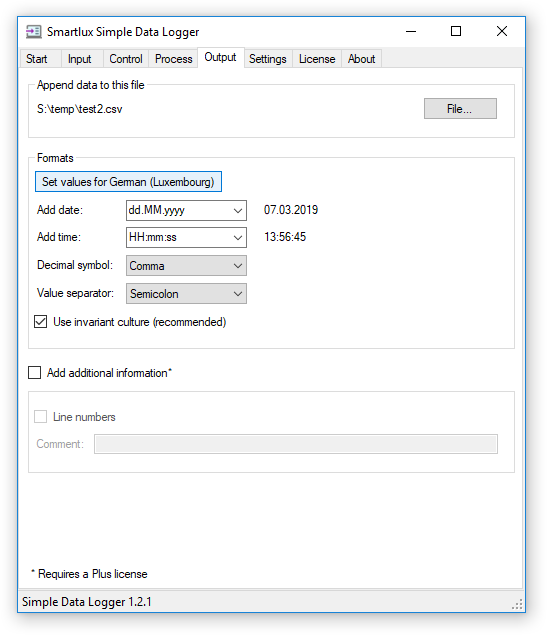
6. Select a file in the output tab. Click on the set values button to automatically set the values below for your region so that you can easily open the CSV file in Excel later. If you want to record the time with milliseconds, choose the appropriate format from the drop down list or enter it manually:
CSV file format settings

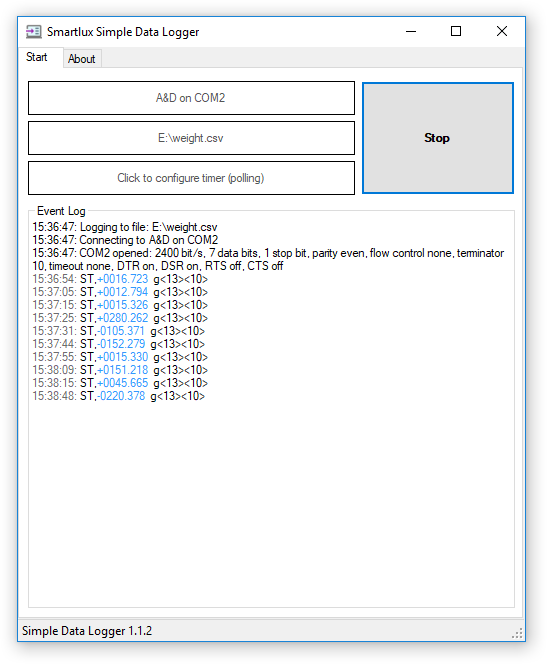
7. Click on the start button in the start tab to connect to the LCCU-21 USB button load cell and to start sending the polling command. Commands and replies are shown in the event log. Captured measurement values appear in blue and are written to the CSV file. Click on stop to stop data acquisition and to close the file:
Data acquisition from A&D LCCU-21 usb button load cell

Notes on the LCCU-21 button load cell

  • I don’t have the LCCU21N100 I used for testing anymore, so if you have any questions about it, please contact A&D.
  • The product brochure (PDF) contains several creative application examples, including one where load is applied by pressing the button load cell with a finger. When I tried this, it worked, but not very well: I found that it is impossible to press only the load sensitive surface (though maybe that’s not an issue for people with smaller fingers). It is therefore advisable to “apply load to the load cell through a rigid surface” as stated in the user manual.

Further information

Raspberry Pi: Connecting a scale can be very easy…

…as long as you choose the right scale! The photo below shows an A&D EK-2000i compact balance connected to a Raspberry Pi 3 Model B using a compatible serial cable and an FTDI RS-232 to USB converter:
Scale connected to Raspberry Pi

Python and pySerial make it easy to read weight data from a scale

On the Pi, I used Python with pySerial to read the weight from the scale. The script I put together is trivially simple. You can download it here or just type it on the Pi:
Script to read weight sent from A&D scale

By pressing the PRINT-Button on the scale, I then sent a few weight values to the Pi and the script wrote them to the terminal (b’ is added by Python):
Weight printed to terminal

In a more useful application, you would want to parse the data sent from the scale to get the weight as a number and then do something with it (maybe write it to a database). You could also do interesting things with the GPIO on the Pi like sounding an alarm when a certain weight is exceeded (though a microcontroller might be better suited for this).

I then switched the scale to “stream mode” (continuous transmission) where it sent 10 values per second (stable or not). The output you see below is the result of placing a single object on the scale and waiting for it to stabilize:
Weight data in continuous mode

I hope this example shows that it can be really easy to transfer the weight from a scale to a Raspberry Pi.

Notes on scales and the Raspberry Pi

One advantage of A&D scales is that (almost) all of them use the same data format and interface parameters and that you’ll find a good description in the manual:
A&D EK-i balance data format

However, you could use also use scales made by other manufacturers as long as they come with an RS-232 interface and the ability to send the weight in ASCII format. Available data output modes vary, so please read the product description carefully before buying.

A converter like the one I used is already built into some scales, which means that you can directly connect them to the Raspberry Pi via USB (you won’t need a serial cable). You’ll find many Ohaus scales with this interface option and the ones I’ve tested worked fine. However, cheaper scales with a USB interface can often not be used with pySerial as they do not emulate a serial port. They can also present other challenges (e.g. data that is not transmitted in human-readable ASCII format).

You do of course not have to use Python, just make sure that your preferred programming language can communicate over a serial port on the Pi. The book Raspberry Pi with Java: Programming the Internet of Things (IoT) contains projects using Ohaus scales and, well, Java.

Finally, please don’t try to use the serial interface already provided by the Pi on the GPIO pins without a logic level converter (RS-232 voltage could reach up to 15V). Excellent further information on serial ports on the Raspberry Pi can be found here.

Record the weight from a scale or balance to a file – Simple Data Logger software

Connecting your scale to a PC and recording the weight should not be a difficult task. However, data logging software available from scale manufacturers or third parties is often expensive, difficult to use or frustratingly unreliable. We developed Simple Data Logger (SDL) to address these issues.

SDL writes the weight received from a scale or balance to a file, optionally adding the date and time. The CSV files generated by SDL can easily be opened in Excel and other spreadsheet applications for further processing and visualization.

Recording the weight from a precision balance using Simple Data Logger

SDL currently supports the following connections:

  • COM port: RS-232, USB virtual COM port, Bluetooth SPP, etc.
  • TCP/IP: Ethernet, WLAN (raw TCP format only).

Note: Your scale has to send data in ASCII format.

Get started recording weight values with Simple Data Logger

Connect your scale to your computer, download and install SDL, then follow these steps to configure the software (updated on December 7, 2019 – please refer to the documentation on the SDL website for the latest instructions):

  1. Input tab:
    Input tab: A&D scales and balancesIf your scale or balance is listed in SDL, simply select it and press the set default parameters for device button. Otherwise, select “generic measuring instrument” and enter the interface parameters manually. Set the radio button to match your connection: COM port (RS232, USB VCP, Bluetooth SPP) or TCP/IP.Make sure that you’ve specified a terminator (a.k.a. delimiter, the last character your scale sends in each line of data) or a timeout (e.g. 100ms, SDL will process received data if no additional data is received during this time).
  2. Output tab:
    Output tab (English US)Choose a file for the recorded data. SDL will create if for you if it does not exist (otherwise, data will be appended). Choose (or enter) a date and time format or select “None” from the list if you do not want SDL to add the date or time. Pick a decimal separator (for numeric values) and value separator (used to separate values from each other). The correct settings for your locale can be made automatically by clicking on the set values button.
  3. Start tab:
    Start tab: A&D FX-300i balancePress the start button to start recording data. Press the “PRINT” button on your scale or balance to send the weight to SDL. Depending on you scale, this button might have a different name (e.g. “DATA”). Some scales like the A&D FX-300i used in this example also have to ability to automatically transfer each (stable) weight. Data received will be shown in the event log (with the captured weight value shown in blue) and the weight will be written to the chosen file. Press stop to stop data logging and to close the file.

    Note: SDL can also handle continuous streams of weight data if this is what your application calls for (we’ve tested it with a scale which sends 100 values per second). The total number of recorded values is only limited by your disk space (but please keep in mind that Excel cannot open files containing more than 1,048,576 rows).

Process the weight values in Excel (or other spreadsheet applications)

Provided that you’ve made the right format settings in the output tab, you can easily open the CSV file in Excel (or other spreadsheet applications like Google Docs, OpenOffice/LibreOffice Calc). The weight will be recognized as a number, allowing you to make further calculations (i.e. calculating the total weight as shown below):
Everything shown here can be done with the “Basic” version of SDL (which is free for personal, non-commercial use). The “Plus” version has additional features including a timer to request the weight from the scale in user-defined intervals.

Very affordable licences can be purchased from our partner FastSpring (immediate license delivery).


Links and further information