This will enable you to transfer the weight directly into a variety of applications as simulated keystrokes, such as Excel, a LIMS, or any other application of your choice. It even works with browser-based applications!
This guide can also be used for the very similar scales from the popular Ohaus Ranger 3000 series.
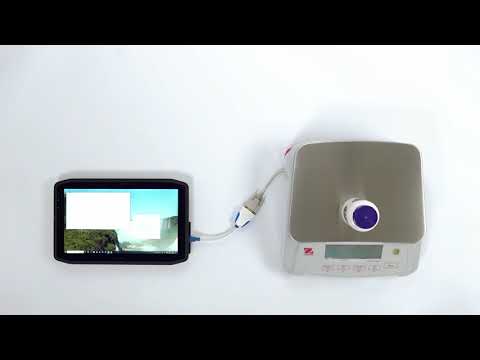
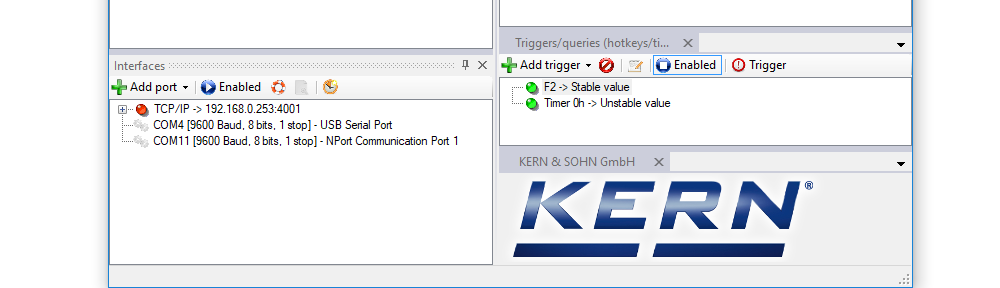
Ohaus Valor 7000 with 232key software
Video transcript
Introduction
This video will show you how to connect your Ohaus Valor 7000 scale to a PC and configure the 232key Virtual Keyboard Wedge software.
Connect the RS-232 cable to the scale
To prevent accidental overloading of the scale, remove the weighing pan and pan support. Then turn the scale upside down.
Open the compartment on the bottom. Connect the serial cable and secure it with the thumb screws.
Remove the cable breakaway tab
Before closing the compartment, break the middle tab on the cover. Turn the balance back over and put the weighing pan back in its place.
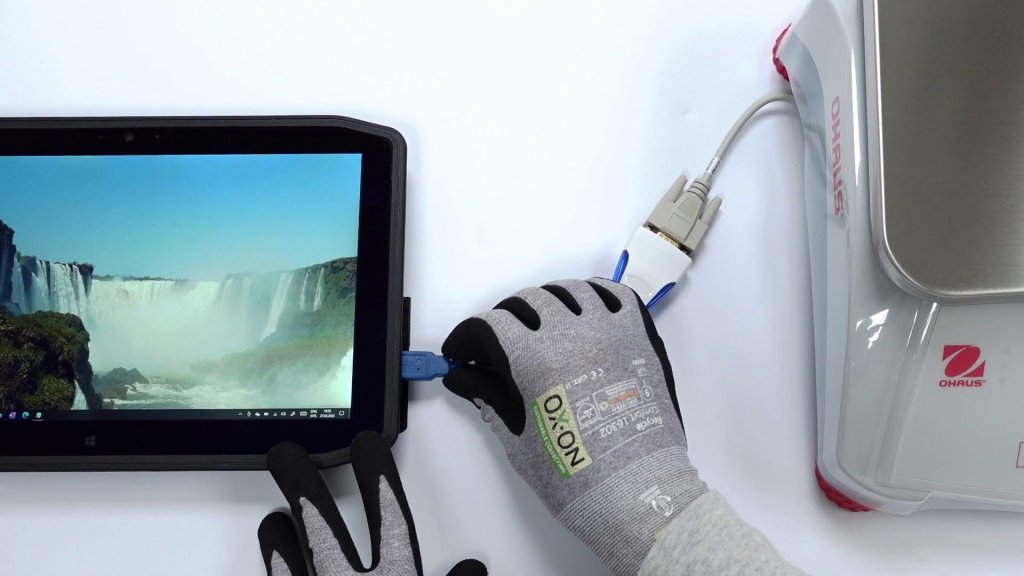
Connect the USB converter to the RS232 cable
Connect the USB converter to the other end of the cable and secure it with the thumb screws.
Connect the USB converter to your PC
Plug the converter into a USB port on your PC. The driver should install automatically. If not, see the video description for download links.
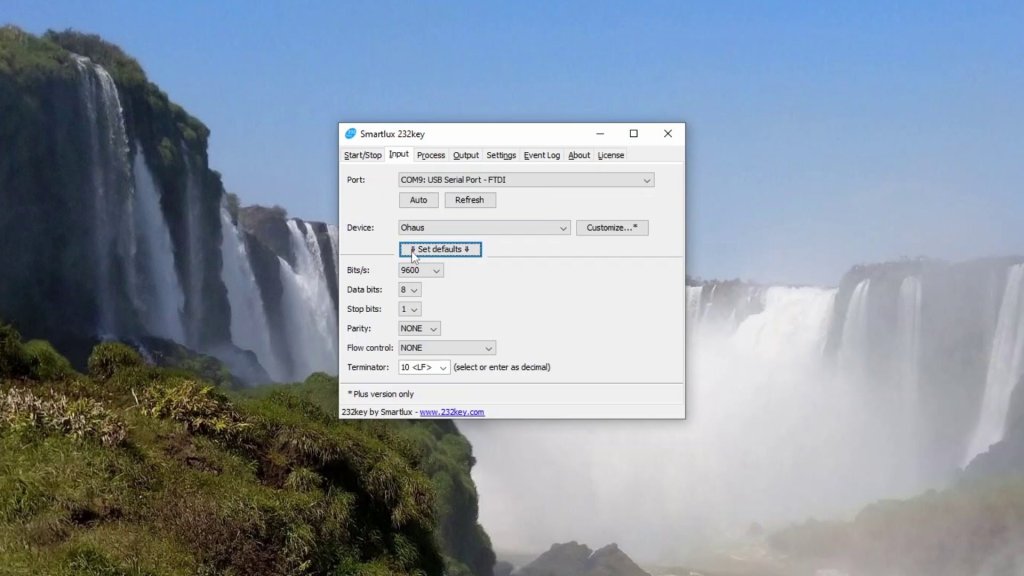
After the device is recognized by Windows, a new COM port will appear. You can find this port in the Windows Device Manager under “Ports (COM & LPT)”. In our case it is called COM9, but the number will probably be different on your system.
Set the “Device” to Ohaus and press the “Set defaults” button to set the serial interface parameters.
In the “Output” tab, select your keyboard type and, if necessary, a key that should be “pressed” after the weight is entered.
Go to the “Start” tab and press the “Start” button. 232key will now start listening for incoming data on the specified COM port and output it as simulated keystrokes.
Switch to the target application, e.g. Excel or a LIMS. For testing purposes we’ll just use Notepad.
Transfer the weight
Turn the scale on. Place an object on the weighing pan and press the PRINT button.
The weight is entered into the target application.
For more information, please visit our website at 232key.com.
This guide applies to the new generation of Ohaus Defender 5000 scales (2018 or later).
It was created using BarTender 2019 R8 and version 1.05 of the Ohaus Defender 5000 firmware. It may not apply to future versions.
I’m not a BarTender expert, if you think that you have a better solution, please let me know in the comments.
BarTender communicates with a scale by requesting the weight and – if supported – the tare weight in short intervals (every 250 ms by default). The received data is then parsed using regular expressions.
Unfortunately, the “Ohaus” protocols defined in BarTender do not work with the default settings of the current Defender 5000 scales. They also don’t support requesting the tare weight. Therefore, we’ll use the MT-SICS protocol instead. As you’ll see below, this is a very straightforward solution. However, for a limited number of multi-interval Defender 5000 scales, we’ll need to modify the regular expressions used by BarTender.
Note for legal-for-trade applications (verified scales): If you’re planning to use the alibi memory (SD card) installed in the Defender 5000 indicator, please note that the solution proposed here does not create alibi records. To do so, you would have to use the Ohaus “P” (print) command instead of the MT-SICS command to request the weight. However, this would create an alibi entry every 250 ms, which is probably not what you want either. In my opinion, the communication method used by BarTender is not well suited for use with verified scales and alibi records.
Configuring your Ohaus Defender 5000 scale
Note: This guide assumes that you’ve already connected your scale to your PC. I used the standard RS-232 port found on all current Defender 5000 models. Using the optionally available USB or Bluetooth interface (SPP) would be almost identical.
Apparently, you do not need to change the configuration of the scale, as it already supports MT-SICS commands in its default “Demand” mode. However, if you want to explicitly set it to the MT-SICS protocol, press and hold the Menu button, then press 7 to enter the Communication menu, select the interface you’re using, press 2 for Setup and then change the Assignment from “Demand” to “SICS”:
The other settings on this screen should not matter, as they’re irrelevant for the selected protocol.
Configuring BarTender
Add Scale Wizard Step 1
Start Bartender Designer, select Administer>Weighing Scale Setup and Add Scale. This will launch the Add Scale Wizard. Click on Next.
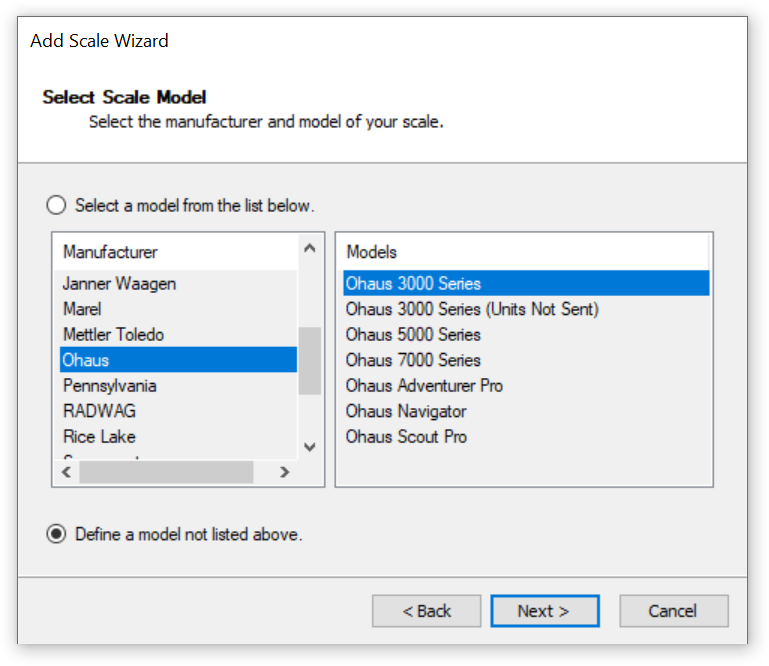
As mentioned, simply selecting “Ohaus 5000 Series” (or any other Ohaus model) will not work with the current Defender 5000 scales. Instead, select Define a model not listed above and click on Next.
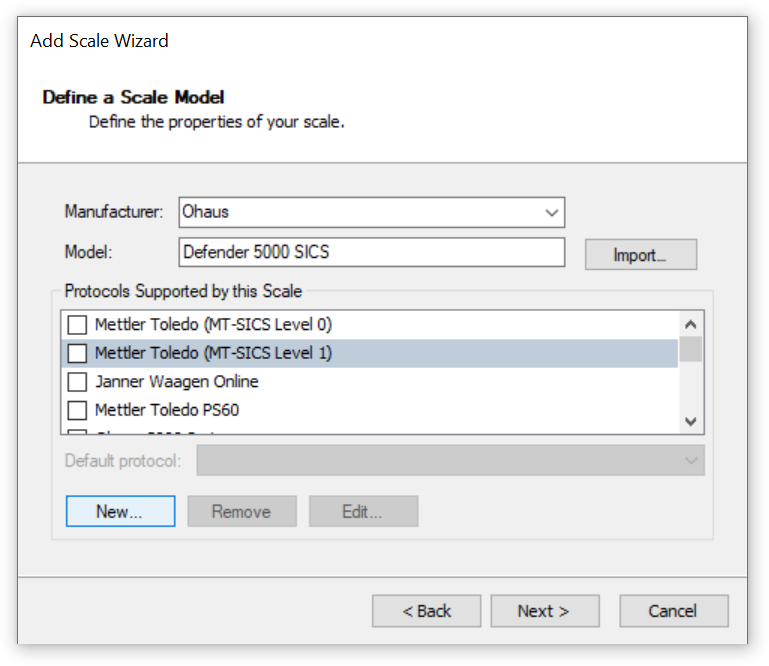
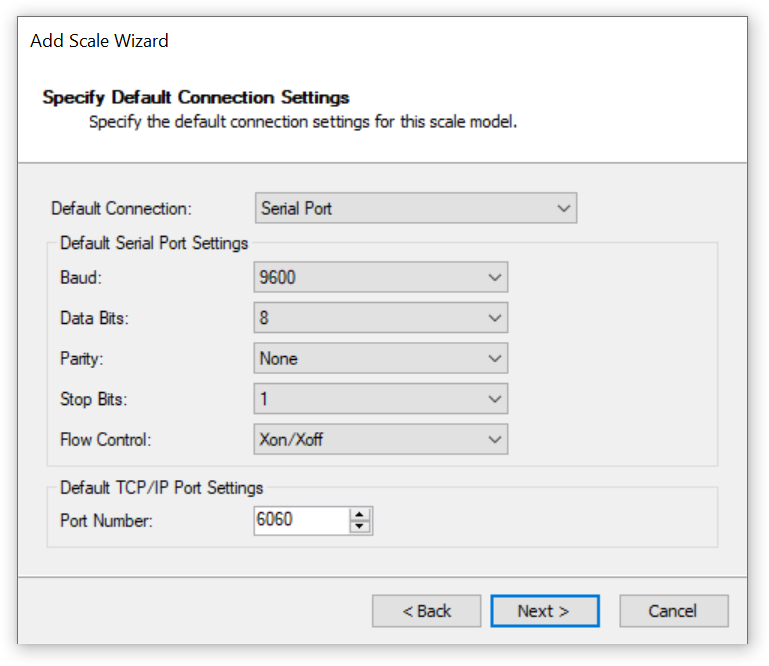
Add Scale Wizard Step 2
Select “Ohaus” as the manufacturer and enter a model name (e.g. “Defender 5000 SICS”).
If your scale is a single interval scale (which means that the readability does not change over the entire weighing range), select the “Mettler Toledo (MT-SICS Level 1)” protocol and click on Next. Then skip to step 3 of this guide far below.
If your scale is a multi-interval scale, things may get a bit more complicated. It all depends on the readability (aka “graduation”, “d” or “e”) of your scale. If it has the same number of decimal places over all intervals when using the default unit (kg), you can also go to step 3. If the number of decimal places is not the same, continue reading here.
Example:
0.005 kg = 3 decimals, 0.01 kg = 2 decimals
Creating a new protocol
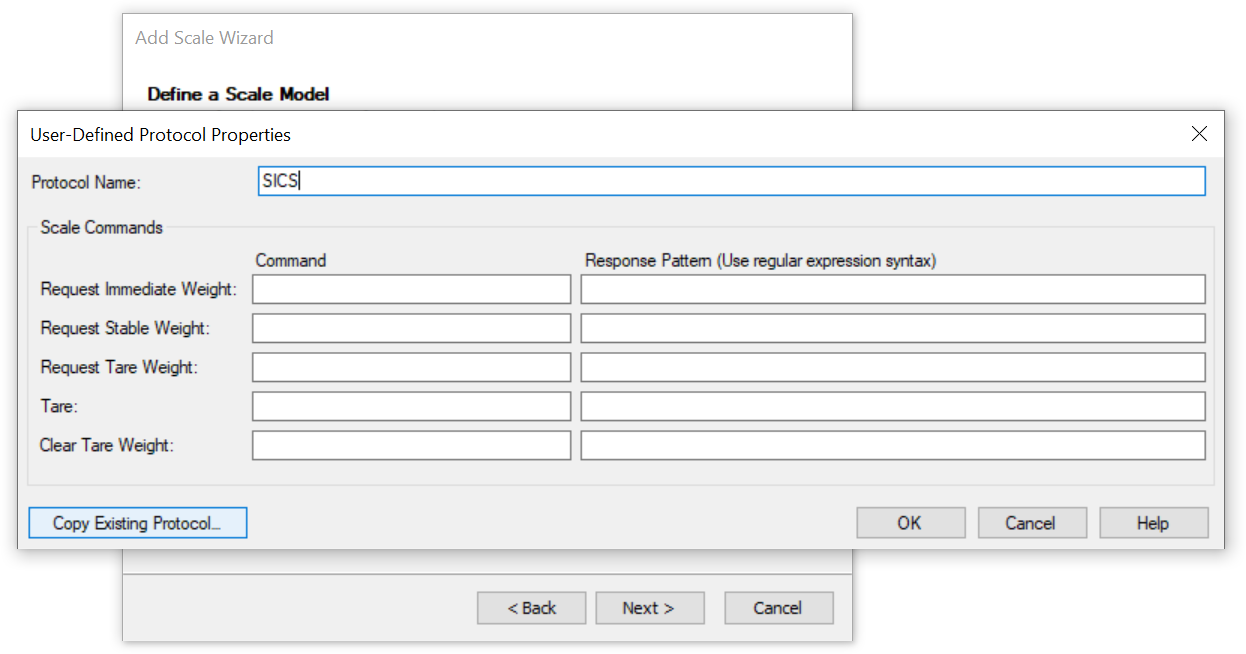
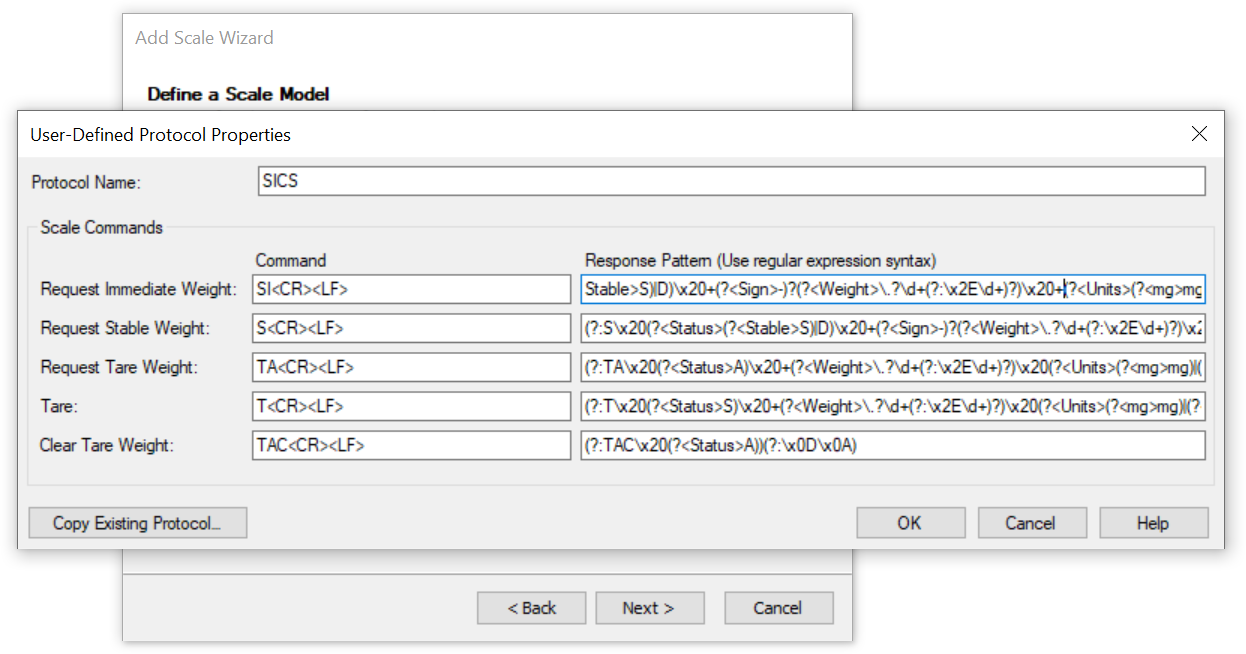
For multi-interval scales that don’t have a constant number of decimal places, we have to make a tiny change to the regular expressions defined in BarTender’s MT-SICS Level 1 protocol. Since we can’t modify existing protocols, click on New to create a new one.
Give the new protocol a name (e.g. “SICS”) and click on Copy existing Protocol.
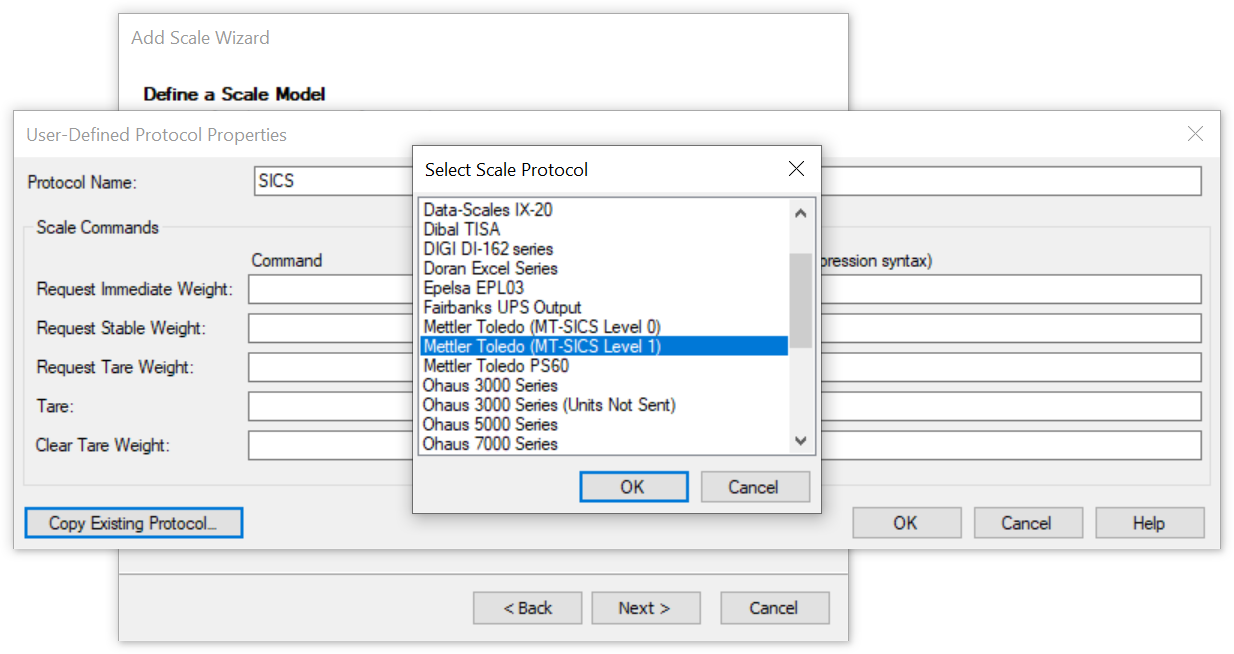
Select “Mettler Toledo (MT-SICS Level 1)” and confirm with OK. All fields for the commands and response patterns should now be filled in.
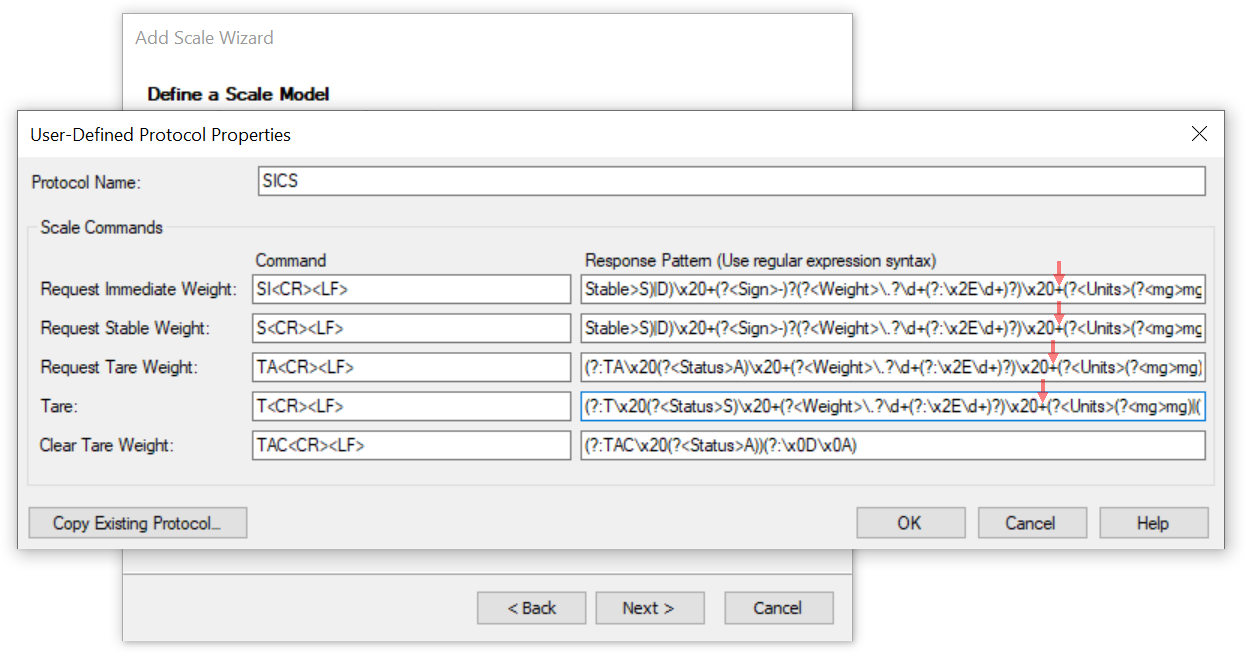
In every single response pattern except for the last one, locate the following string:
\x20(?<Units>
Change it to:
\x20+(?<Units>
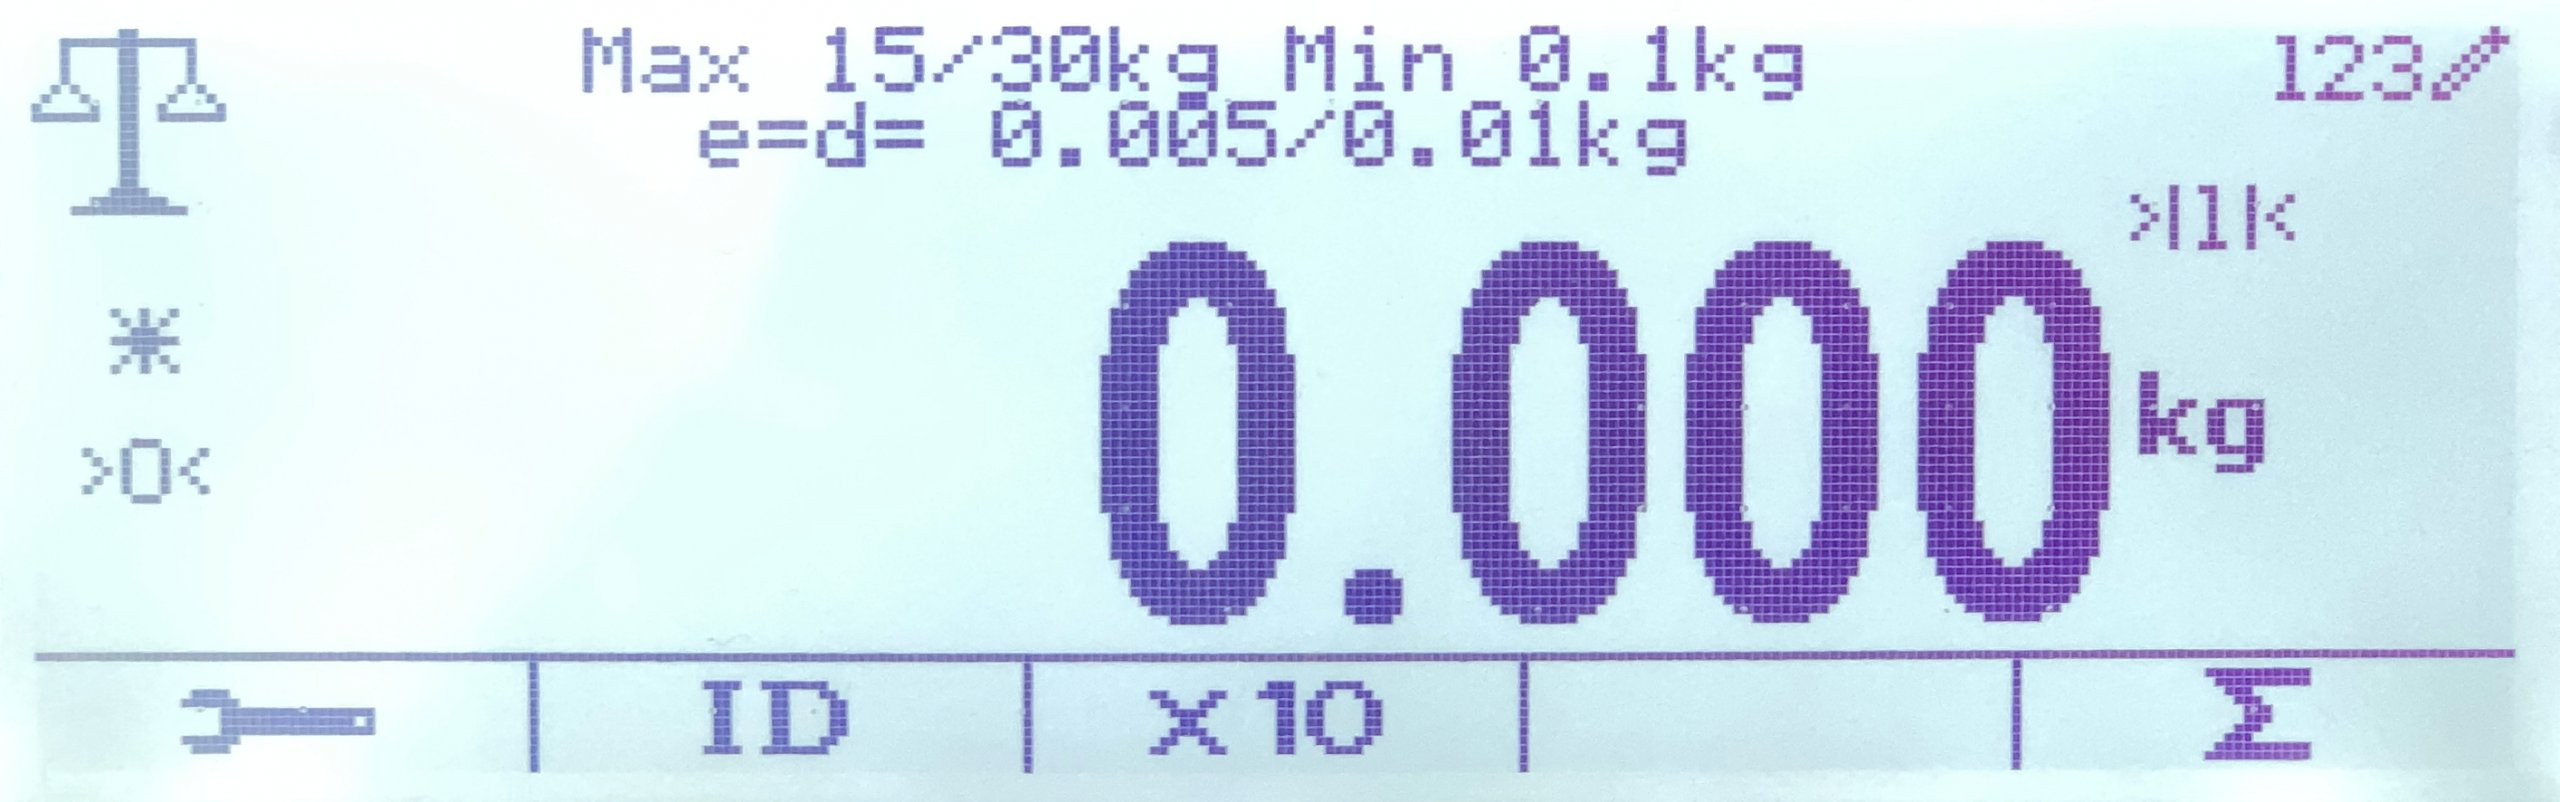
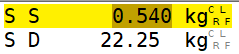
By adding a plus sign, the regular expression now matches strings which contain one or more spaces (\x20) in between the weight (or tare) value and the unit. This is necessary because some multi-interval Defender 5000 scales use two spaces after switching to the second interval:
Note how the second line contains two spaces after “22.25”. With the default regular expression defined in BarTender, this weight value (and all others in the same interval) would not be captured.
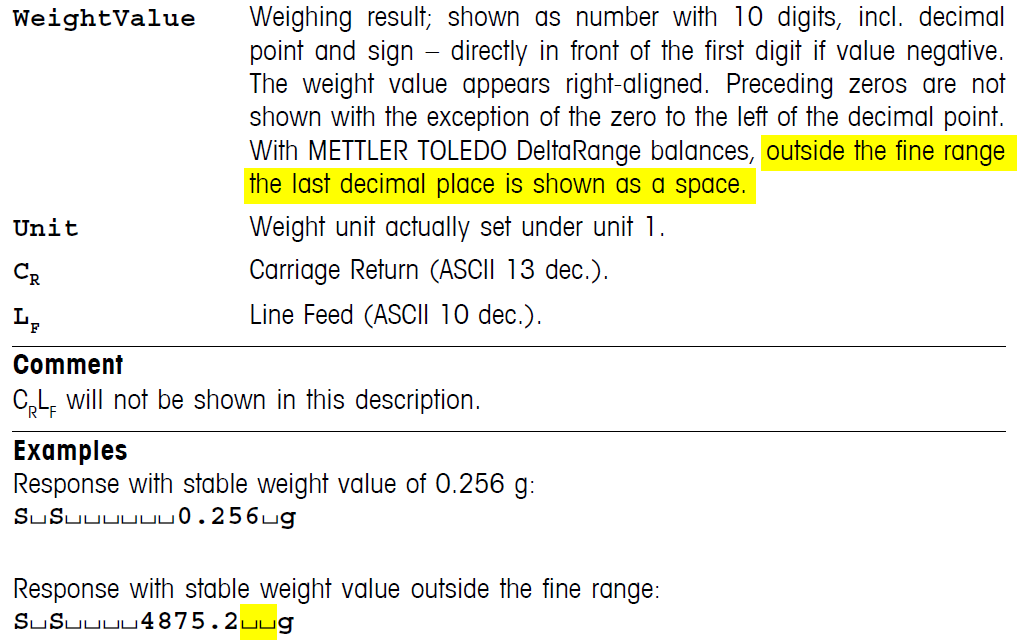
I don’t know if BarTender was too strict or if Ohaus was too lax in implementing the MT-SICS protocol. I believe it’s better if I don’t comment on this any further. According to the MT-SICS protocol documents I’ve reviewed, the weight should be right-aligned and separated from the unit with one space character. However, the descriptions of MT “DeltaRange” multi-interval balances mention that the last digit is replaced by a space when the number of decimal places changes:
Therefore, it seems that Ohaus did nothing wrong and the regular expression in BarTender did not account for this scenario.
Note: If you’re regularly dealing with regular expression, I highly recommend the wonderful RegexBuddy software.
Your user-defined protocol should now look like this: Click on OK.
Select the protocol we’ve just defined and click on Next.
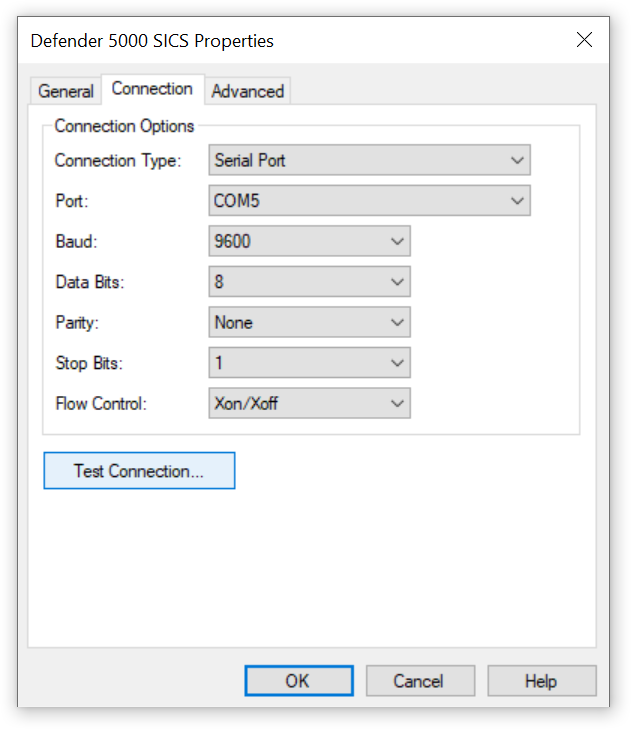
Everything in this dialog should be correctly configured for the use of a serial port (RS-232, USB or Bluetooth SPP). Click on Next.
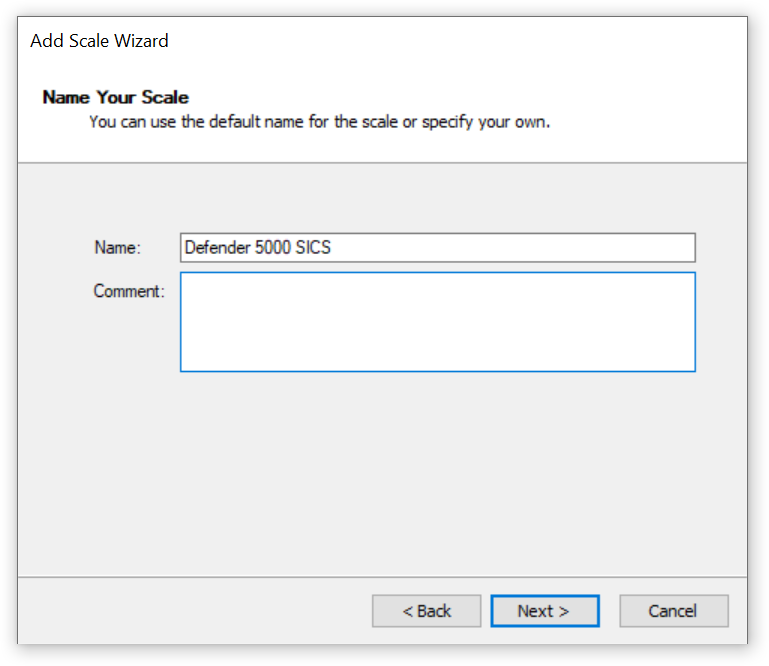
Add Scale Wizard Step 3
Welcome back, my lucky readers who did not have to deal with protocols and regular expressions. Change the name of the scale if you feel like it and then click on Next.
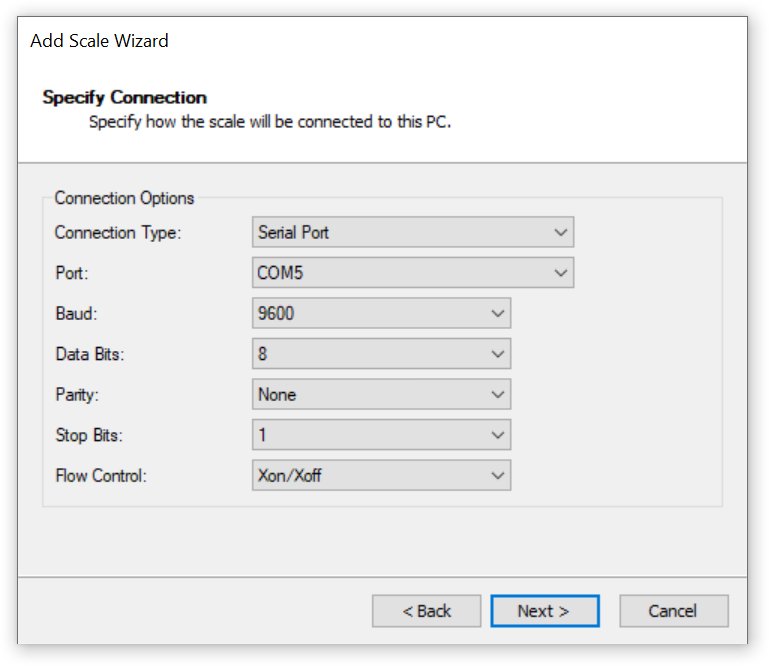
In this dialog, you must specify the COM port on your computer that is used to connect to your Ohaus Defender 5000 scale.
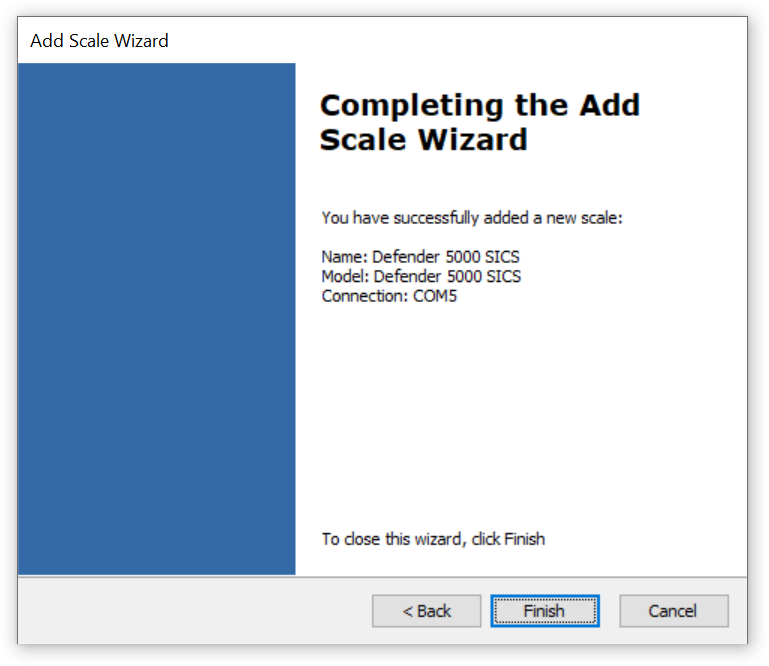
This is it! We’re done! Click on Finish, but don’t bring out the champagne just yet.
Testing your Ohaus Defender 5000 scale
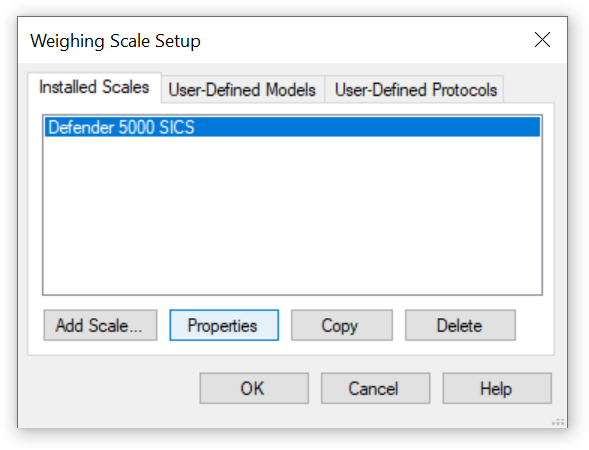
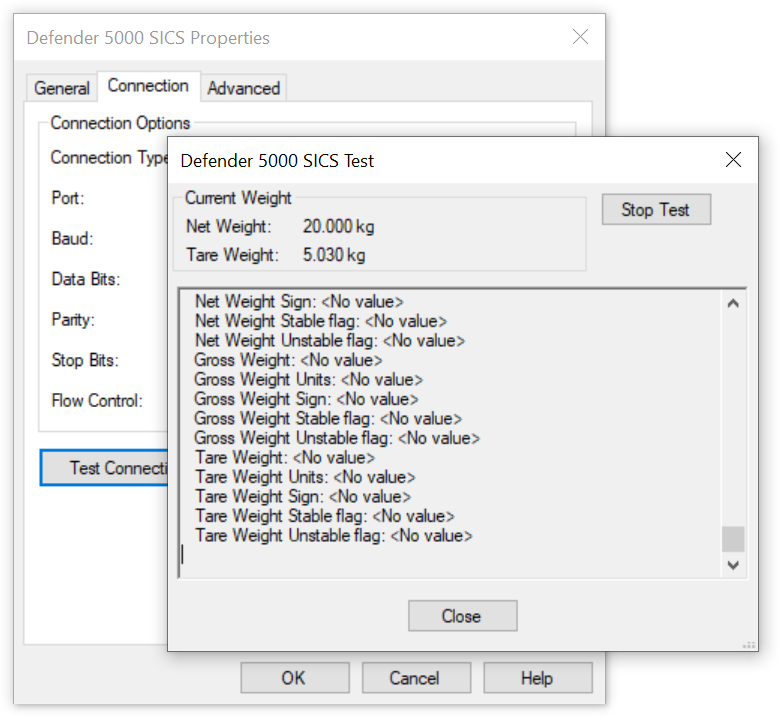
Back in the Weighing Scale Setup, select the scale you’ve just added and click on Properties.
Click on Test Connection. If everything is correct, BarTender should show the Net Weight and Tare Weight received from your scale:
In that case, congratulations, you succeeded. You can now use the values from your scale in BarTender.
Should you not see any weight values, you’ll find some troubleshooting information below.
Troubleshooting a scale connection
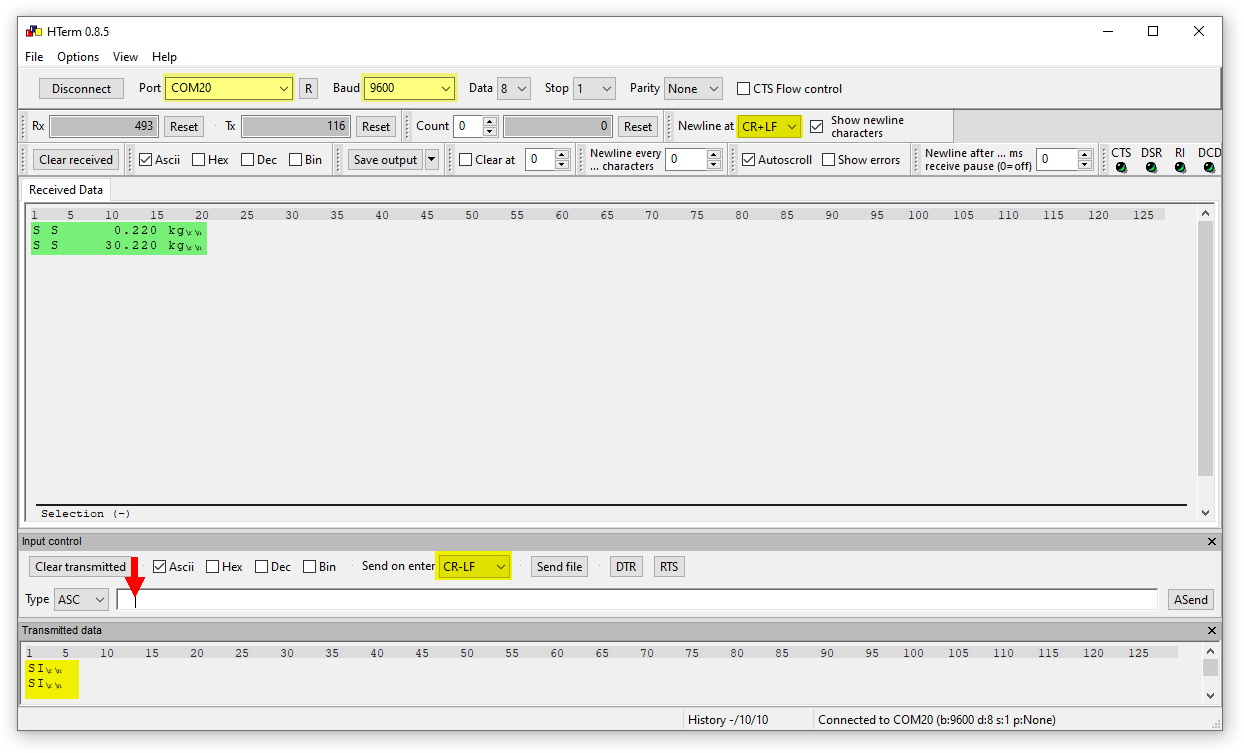
Unfortunately, communication problems with scales can have many causes and are often difficult to solve. I can’t give you extensive troubleshooting instructions here, but I’ll tell you the same thing I also tell our software users: Download HTerm, a simple terminal program. Then try to communicate with your scale using HTerm instead of BarTender:
Change the following settings in HTerm:
COM port,
Baud to 9600,
Newline at to “CR+LF” (optional, looks nicer),
Send on enter to “CR-LF” (required).
Click on the Connect button at the top (shown as Disconnect in the screenshot as I had already clicked on it). Then type the “SI” (send immediately) command manually into the input field (lower red arrow) and press enter.
You should see the command you just sent under Transmitted data and the reply from the scale under Received Data (marked green on the screenshot).
If communication is successful with HTerm but not with BarTender, the problem is with BarTender. If you’ve changed the regular expression as described above, double-check that you’ve not made any mistakes. Contact Seagull Scientific for further support. Please don’t ask me for help in the comments.
If you can’t communicate with your Defender 5000 scale using HTerm, something is wrong with your setup. In my experience, the most likely culprits are:
Wrong COM port.
Wrong interface parameters (baud rate, etc.).
Wrong type of serial cable.
Please understand that I cannot diagnose these problems for you remotely. You may want to contact your Ohaus dealer or pay a specialist to help you.
Two versions of Kern’s BalanceConnection software are now available: the standard version (SCD-4.0) and the Pro version (SCD-4.0-PRO).
The following table shows the features of the standard version on the left and the additional features of the Pro version on the right (according to Kern’s 2019 catalog):
BalanceConnection SCD-4.0
BalanceConnection SCD-4.0-PRO
· For operating systems Windows XP, Vista, 7, 8, 8.1, 10 · Supports balances measuring devices with RS 232, RS 485, Bluetooth, LAN or WLAN network (TCP/UDP/IP) · Highly flexible formatting of the output (any order, formatting and rounding), particularly recording of date and time for every value transferred, if required · Any number of devices/interfaces can be connected, as well as simultaneous and synchronised recording of several balances · Key-activated or time-controlled interro- gation of measurements or trigger of device functions, also for continuous recording · The interface protocols for KERN balances are already predefined (standard configuration) · Compatible interface cable included when you order a KERN balance at the same time · Many different transfer and recording options: – Microsoft ® Excel/Access/Word in the fore ground or background – Other Windows applications (through key simulation), e.g. shipping software or ERP system (SAP, Sage, etc.) – File recording (e.g. as text or CSV file) – Print out on text or label printer – Screen output such as large display, line chart (drying curve for moisture analyzer), histogram, etc.
· ODBC/SQL databases such as SQL Server or MySQL · Transfer to HTTP Webservices/Web forms · Histogram · Enables the connection of medical balances to practice EDP systems using the device data transfer protocol (GDT) and also the HL7 protocol · Implementation of programs/scrips using freely-definable command lines · Command sequences · Defining the conditions for specific events and the reaction to these events · Filter for stability recognition (configurable value storage) · Central configuration repository, e.g. on the network · On-screen displays with configurable user interface for flexible balance operation
If you do not need the features listed on the right, the standard version is the right choice. However, this version has also become a bit more expensive compared to the single version available so far.
Inexpensive alternatives
If you don’t need the extensive functionality of BalanceConnection and only want to connect a single scale to your PC, we offer two very inexpensive alternatives. Each of these programs has a single purpose and is therefore easy to set up and use:
232key: Transfers the weight to any application (e.g. Excel, shipping software, etc.) using a key simulation (virtual keyboard wedge).
Simple Data Logger: Stores the weight in a CSV file (if desired with date and time), the weight can also be retrieved from the scale using a timer (Plus version only).