A blog about weighing scales and weighing industry news
Category: Software
Here you will find all of our articles about software for scales and balances (weighing software). We mostly focus on software for data acquisition (recording the weight on a PC) as well as scale management and configuration software.
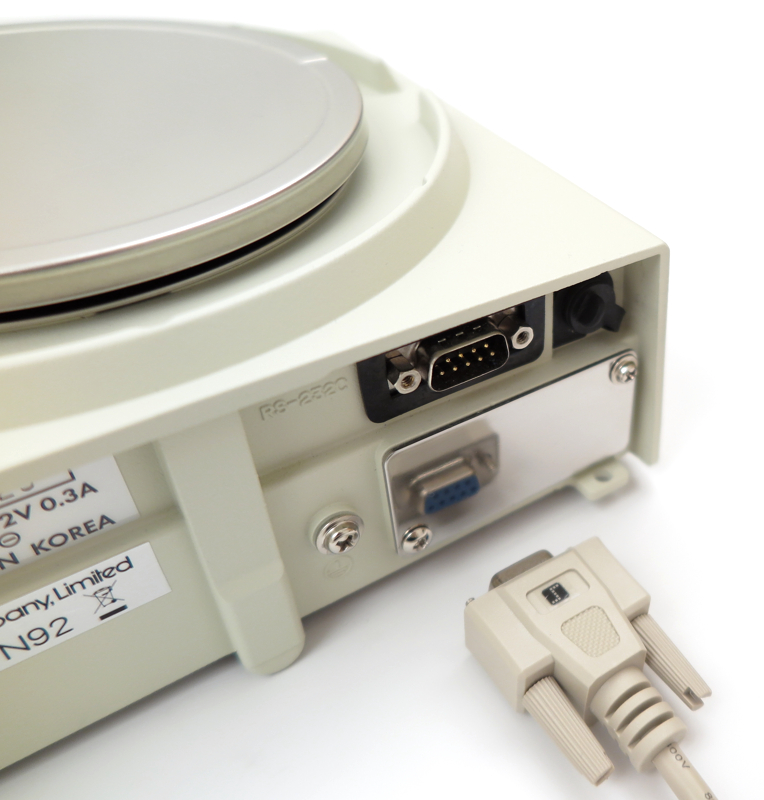
A&D’s LCCU-21 USB subminiature button load cells are available in capacities ranging from 100 N to 1 kN. Their tiny size makes it easy to incorporate them into your own machinery or test equipment. They are connected to an A/D converter with a USB interface, enabling you to quickly build PC-based force measurement and data acquisition systems at a very affordable price.
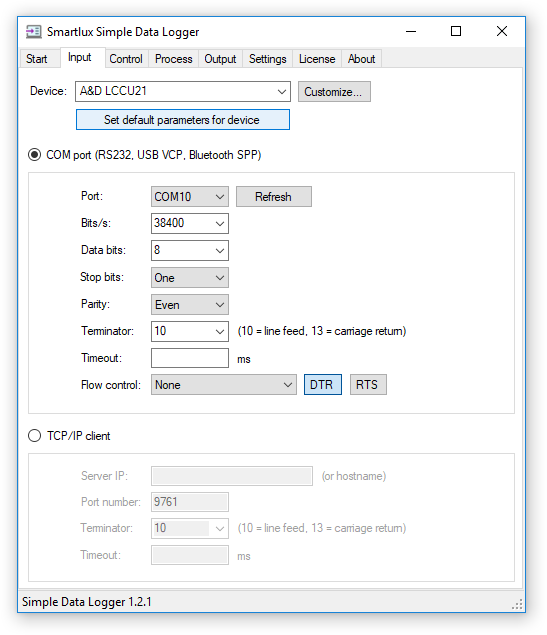
LCCU21 device profile in Simple Data Logger
As an alternative to A&D’s free WinCT-DLC application, you can also use these load cells with the most recent release of our Simple Data Logger software (SDL v1.2.1). In this article, I’ll show you how to configure SDL to request data from the load cell in user-defined intervals (polling).
The LCCU-21 button load cell has two data transfer modes: continuous transfer of up to 100 values/s and a command/reply mode. Currently, only the second mode is supported by Simple Data Logger (continuous mode has to be started and stopped by sending special commands to the LCCU-21, which is something that will be available in a future version of SDL).
Force measurement using A&D’s LCCU-21 button load cell and Simple Data Logger
3. In the input tab, set the device to “A&D LCCU21”, then click on set default parameters for device. This will set all interface parameters for you. The only thing left to set is the (virtual) COM port which appeared on your PC after connecting the LCCU-21 to a USB port (see this PDF document for further information):
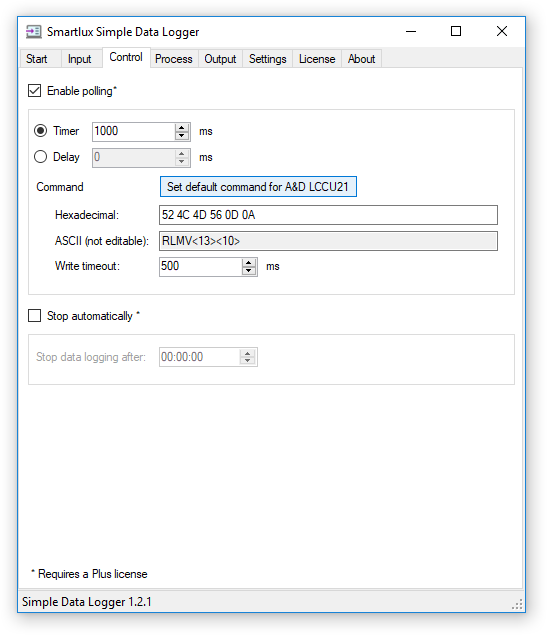
5. Switch to the control tab, enable polling and set the timer to a value that makes sense for your application. Click on set default command for A&D LCCU21; this will automatically enter the “RLMV” command which will be sent to the USB button load to request measurement data:
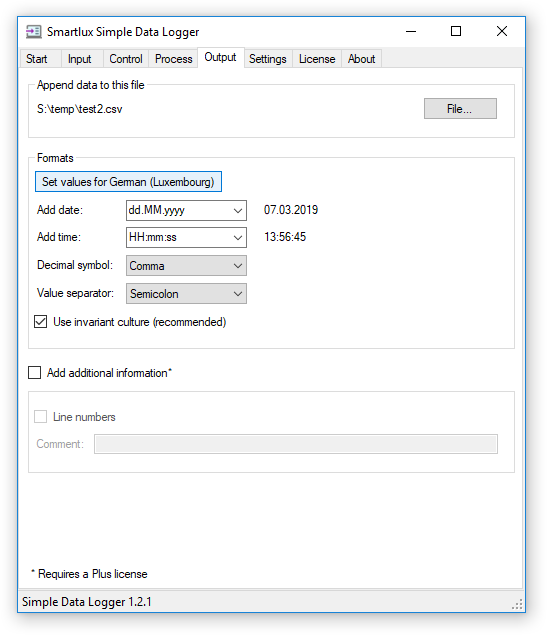
6. Select a file in the output tab. Click on the set values button to automatically set the values below for your region so that you can easily open the CSV file in Excel later. If you want to record the time with milliseconds, choose the appropriate format from the drop down list or enter it manually:
7. Click on the start button in the start tab to connect to the LCCU-21 USB button load cell and to start sending the polling command. Commands and replies are shown in the event log. Captured measurement values appear in blue and are written to the CSV file. Click on stop to stop data acquisition and to close the file:
Notes on the LCCU-21 button load cell
I don’t have the LCCU21N100 I used for testing anymore, so if you have any questions about it, please contact A&D.
The product brochure (PDF) contains several creative application examples, including one where load is applied by pressing the button load cell with a finger. When I tried this, it worked, but not very well: I found that it is impossible to press only the load sensitive surface (though maybe that’s not an issue for people with smaller fingers). It is therefore advisable to “apply load to the load cell through a rigid surface” as stated in the user manual.
A&D’s FX-i and FZ-i precision balances are equipped with a serial interface (RS-232) and can be easily connected to a computer for data transfer (if necessary with a converter from RS-232 to USB or to Ethernet). You can, of course, also connect other devices such as a serial printer, a data logger or a secondary display.
I recently tested all communication modes and their various settings in order to update the product description in our German scales shop. Since this took me a lot of time, I also translated my findings into English for publication on this blog.
I found that all commonly used communication modes (a.k.a. transfer modes, transmission modes) are supported and that they can often be fine-tuned in a way rarely possible with other balances. Concerning the data format, the FX-i and FZ-i balances support not only A&D’s standard format, but also several other formats which might make these scales suitable as a drop-in replacement for older Mettler Toledo or Sartorius balances. However, the more recent SICS protocol was not implemented.
The balances support a number of commands for bidirectional communication. However, not all applications and settings are accessible via remote commands (for example, the limits for checkweighing cannot be set by a connected computer).
You can use any terminal software to test communication via the RS-232 interface (e.g. HTerm or PuTTY). For productive use, I recommend A&D’s free WinCT software or our Simple Data Logger software. The best integration can often be achieved by customizing your own software to communicate directly with the balance.
RS-232 interface and cable
FX-i and FZ-i balances have a built-in DE9M connector and require a straight (1:1) cable (not a null modem cable):
Interface parameters
Default settings are highlighted in bold:
Baud rate: 600, 1200, 2400, 4800, 9600, 19200 Data bits: 7 bits or 8 bits Parity: even, odd (for 7 data bits), none (for 8 data bits) Stop bits: 1 bit Data flow control (handshaking): none (RTS and CTS lines are connected internally but not used for actual flow control).
Data format
By default, the balances use the proven A&D format and transmit 17 ASCII characters for each weight value:
First line: number; second line: ASCII characters sent by the balance; third line: hexadecimal value
1
2
3
4
5
6
7
8
9
10
11
12
13
14
15
16
17
S
T
,
+
0
0
4
5
6
.
8
9
g
CR
LF
53
54
2C
2B
30
30
34
35
36
2E
38
39
20
20
67
0D
0A
As far as I know, the very first scale from A&D with a data interface already used the same format. This is very impressive, particularly when other manufacturers sometimes change the data format between firmware updates or even between transmission modes.
As alternatives to the A&D format, 5 further data formats can be used. The user manual (PDF) contains a detailed description in chapter 10-6.
Communication modes
The corresponding setting in the menu of the balance is indicated in [square brackets].
Key mode: The weight is transmitted when the PRINT button on the balance is pressed.
Mode A: Only when the weight is stable [dout / Prt 0].
Mode C: The balance waits until the weight has stabilized and then transmits it [dout / Prt 5].
Auto-print: The weight is automatically transmitted after stabilization.
Mode A: Return to zero is required before next transmission [dout / Prt 1]. You can set which range around zero counts as “zero” (10, 100 or 1000 digits) [dout / AP-b]. You can also specify whether only positive, negative or all values should be transmitted [dout /AP-P].
Mode B: No return to zero is required before the next transmission [dout / Prt 2]. You can set the required difference from the last stable value (10, 100 or 1000 digits) [dout / AP-b]. You can also specify whether lower, higher or all values should be transmitted (compared to the last stable value) [dout /AP-P].
Stream mode: Continuous transmission of 5, 10 or 20 values/s [dout / Prt 3]. The frequency is determined by the display refresh rate [bASFnc / SPd]. This mode is not suitable if you connected a printer or hardware data logger to the balance, but it is required if you want to use an external display. Our data logger software can also easily handle this number of values per second.
Interval mode: Transmission of a value every 2, 5, 10, 30 or 60 seconds or every 2, 5, or 10 minutes [dout / Prt 6].
Command mode: The balance responds to commands received over the interface (bi-directional communication). Available in all modes, see commands below.
In mode 1, 2 and 4, the display blinks to signal that the weight has been transmitted.
Supported commands
“Q” is used to request the displayed weight immediately, while “S” is used to request the weight once it has stabilized. All commands must be terminated with carriage return and line feed:
No.:
1
2
3
ASCII:
Q
CR
LF
Hex:
51
OD
0A
Complete list of commands (in alphabetical order):
?ID
Requests the balance ID (can be set through the menu).
?PT
Requests the tare value set by using the PT or T command (does not work for tare values set by using the RE-ZERO button on the scale)
?SN
Requests the balance’s serial number.
?TN
Request the balance’s model name.
C
Cancels the S or SIR command (before completion).
CAL
Same as pressing the CAL button.
<ESC>P
Same as the “S” command. <ESC> is the escape control character (1Bh).
<ESC>T
Same as pressing the RE-ZERO button.
EXC
Calibration using an external weight (only for FZ-i).
Q
Requests the weight data immediately.
OFF
Turns the balance off.
ON
Turns the balance on.
P
Same as the ON:OFF button (“P” = power?).
PRT
Same as pressing the PRINT key.
PT
Sets a tare value, PT:xxx.x g. The unit must be transmitted using A&D’s format (3 characters, right-justified, padded with spaces).
R
Same as pressing the RE-ZERO key.
S
Request the stabilized weight. If the weight is currently not stable, the balance waits until it has stabilized. There seems to be no timeout (though the command can be cancelled with “C”).
SI
Same as “Q”.
SIR
Switch to stream mode (continuous transmission).
SMP
Same as pressing the SAMPLE key
T
Tares the balance.
U
Same as pressing the MODE key.
Z
Same as pressing the RE-ZERO key.
Other settings affecting RS-232 data transmission
You can set the balance to acknowledge valid commands with the ACK control character (06h) and to reply to invalid with “EC” and an error number [SiF / ErCd]. The manual contains detailed information and examples in chapter 16-2.
The terminator can be changed from carriage return and line feed (0Dh 0Ah) to carriage return (0Dh) [SiF / CrLf]. This affects both the output and the input (commands).
It’s also possible to change the decimal point to a comma [bASFnc / Pnt].
The balance can re-zero (tare) itself after sending the weight, which is useful during formulation [dout / Ar-d].
FZ-i balances are equipped with an internal clock and calendar and can output the time, date or time and date [bASFnc / dout / S-td]. According to the manual, this only works when outputting GLP data and not with individual weight values (I will test this later this week). This information can be added to the weight data [dout / S-td].
You can use the animal weighing application to calculate an average weight and automatically output it (as shown in this short video). Statistical calculation mode can output numbered individual weight values and summarized statistical data.
You’ll find further settings in a function table in the user manual (chapter 10).
Two versions of Kern’s BalanceConnection software are now available: the standard version (SCD-4.0) and the Pro version (SCD-4.0-PRO).
The following table shows the features of the standard version on the left and the additional features of the Pro version on the right (according to Kern’s 2019 catalog):
BalanceConnection SCD-4.0
BalanceConnection SCD-4.0-PRO
· For operating systems Windows XP, Vista, 7, 8, 8.1, 10 · Supports balances measuring devices with RS 232, RS 485, Bluetooth, LAN or WLAN network (TCP/UDP/IP) · Highly flexible formatting of the output (any order, formatting and rounding), particularly recording of date and time for every value transferred, if required · Any number of devices/interfaces can be connected, as well as simultaneous and synchronised recording of several balances · Key-activated or time-controlled interro- gation of measurements or trigger of device functions, also for continuous recording · The interface protocols for KERN balances are already predefined (standard configuration) · Compatible interface cable included when you order a KERN balance at the same time · Many different transfer and recording options: – Microsoft ® Excel/Access/Word in the fore ground or background – Other Windows applications (through key simulation), e.g. shipping software or ERP system (SAP, Sage, etc.) – File recording (e.g. as text or CSV file) – Print out on text or label printer – Screen output such as large display, line chart (drying curve for moisture analyzer), histogram, etc.
· ODBC/SQL databases such as SQL Server or MySQL · Transfer to HTTP Webservices/Web forms · Histogram · Enables the connection of medical balances to practice EDP systems using the device data transfer protocol (GDT) and also the HL7 protocol · Implementation of programs/scrips using freely-definable command lines · Command sequences · Defining the conditions for specific events and the reaction to these events · Filter for stability recognition (configurable value storage) · Central configuration repository, e.g. on the network · On-screen displays with configurable user interface for flexible balance operation
If you do not need the features listed on the right, the standard version is the right choice. However, this version has also become a bit more expensive compared to the single version available so far.
Inexpensive alternatives
If you don’t need the extensive functionality of BalanceConnection and only want to connect a single scale to your PC, we offer two very inexpensive alternatives. Each of these programs has a single purpose and is therefore easy to set up and use:
232key: Transfers the weight to any application (e.g. Excel, shipping software, etc.) using a key simulation (virtual keyboard wedge).
Simple Data Logger: Stores the weight in a CSV file (if desired with date and time), the weight can also be retrieved from the scale using a timer (Plus version only).