How to record the weight from an A&D scale or balance using A&D’s free RsWeight software

0. Don’t let the terminology confuse you

For the purpose of this article, “serial”, “RS-232” (with and without hyphen), “RS232C” and “COM” can be treated as synonyms. Therefore, a “serial port”, “RS-232C interface” and “COM port” are the same thing.

“Scale”, “balance” and “weighing instrument” are used interchangeably.

1. Connect your A&D scale or balance to your PC

In most cases, your A&D scale will be equipped with an RS-232 interface:

RS-232 interface on A&D FX-300i balance

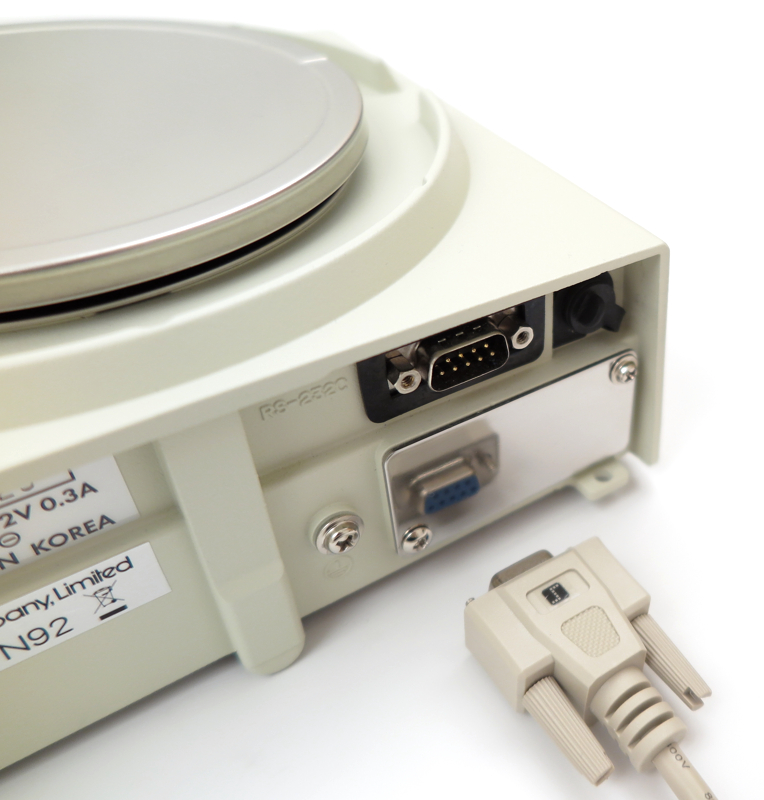
You will need an RS-232 cable (serial cable) which is compatible with your scale and – if your PC does not have an RS-232 port – a converter from USB to RS-232 such as FTDI’s Chipi-X or US232R.

This converter will create a virtual COM port on your PC. A&D also offers a set consisting of a converter and a cable.

There are other kinds of converters such as RS-232 to Ethernet, though they are not covered in detail here. As long as they can create virtual COM ports, they can be used with RsWeight.

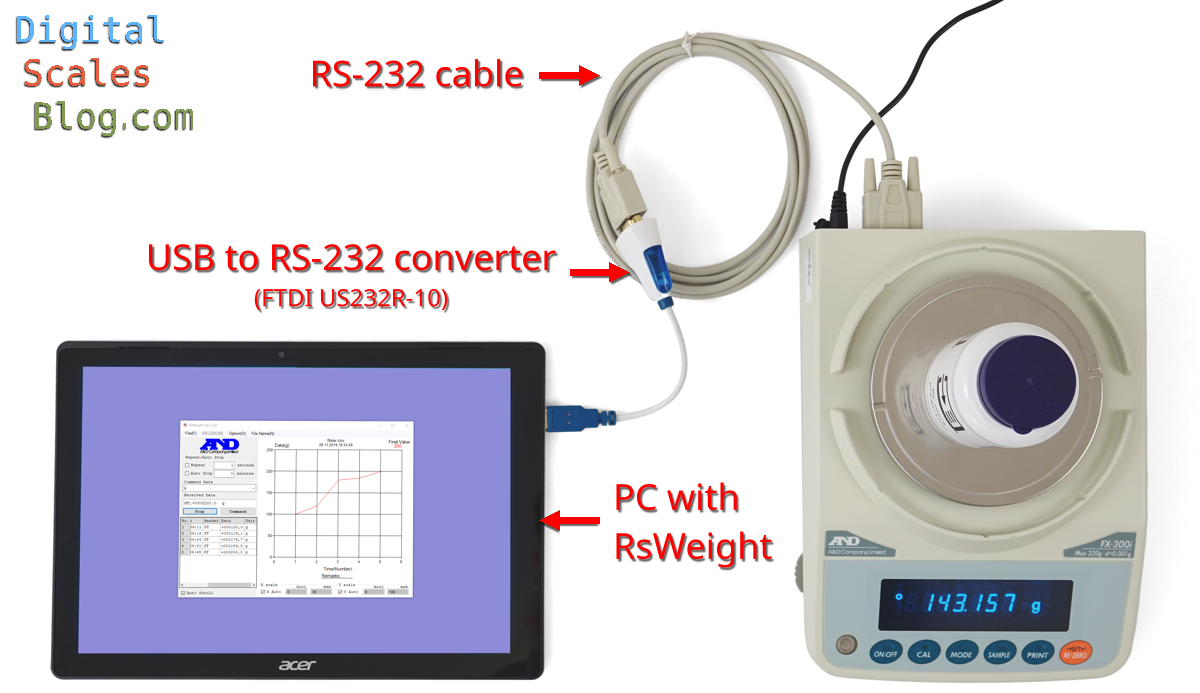
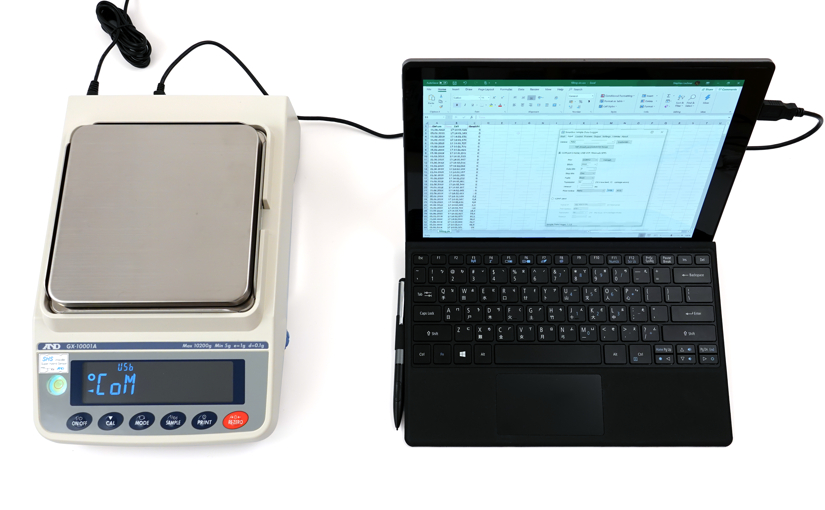
The configuration used is in this tutorial is shown below:

A&D FX-300i balance with RS-232 cable, USB to RS-232 converter and PC running RsWeight software

Not all scales require a converter to USB: The recently released Apollo GX-AE/A & GF-A balances have a USB port which can be configured to work in virtual COM port mode, so all you’ll need is a USB cable. A&D may have released further balances with this functionality by the time you read this article.

Many weighing instruments from A&D can be equipped with a “Quick USB” port. This type of port is recognized as a keyboard and not as a virtual COM port and is therefore not suitable for use with RsWeight (see A&D’s Communication Methods FAQ for further information).

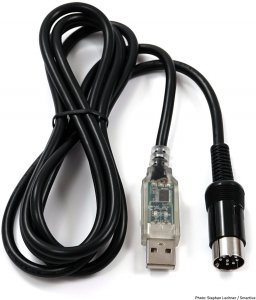
If you know what you’re doing, you can also find USB to RS-232 converters that can be plugged directly into the RS-232 port of your scale (no separate serial cable required). We offer such a solution for A&D scales with a round DIN8 connector such as the HC-i counting scales or FG-KAL/KBM scales (currently only available in our German scales shop):

USB to RS-232 (DIN8) cable

2. Install the driver for the USB to RS-232 converter (or for your balance)

On Windows 10, driver installation will usually happen automatically when you plug in the converter (on your PC). If this is not the case, you can download the driver from the manufacturer’s website, e.g.:

For other converters, please check with your supplier.

3. Download and install RsWeight

RsWeight is available for free from A&D as part of the WinCT suite. Installation is straight forward and should not pose any challenges: Download the Zip file, unzip it, start setup.exe and follow the prompts on the screen.

4. Configure RsWeight

You’ll find RsWeight under the “A&D WinCT” group in the start menu. On Windows 10, you can also open the start menu and start typing “RsWeight”.

In the “RS-232C” menu, select the COM port to which your scale is connected on your system. By clicking on the combo box, you can see the full names (requires RsWeight 5.40 or later):

COM port selection in RsWeight

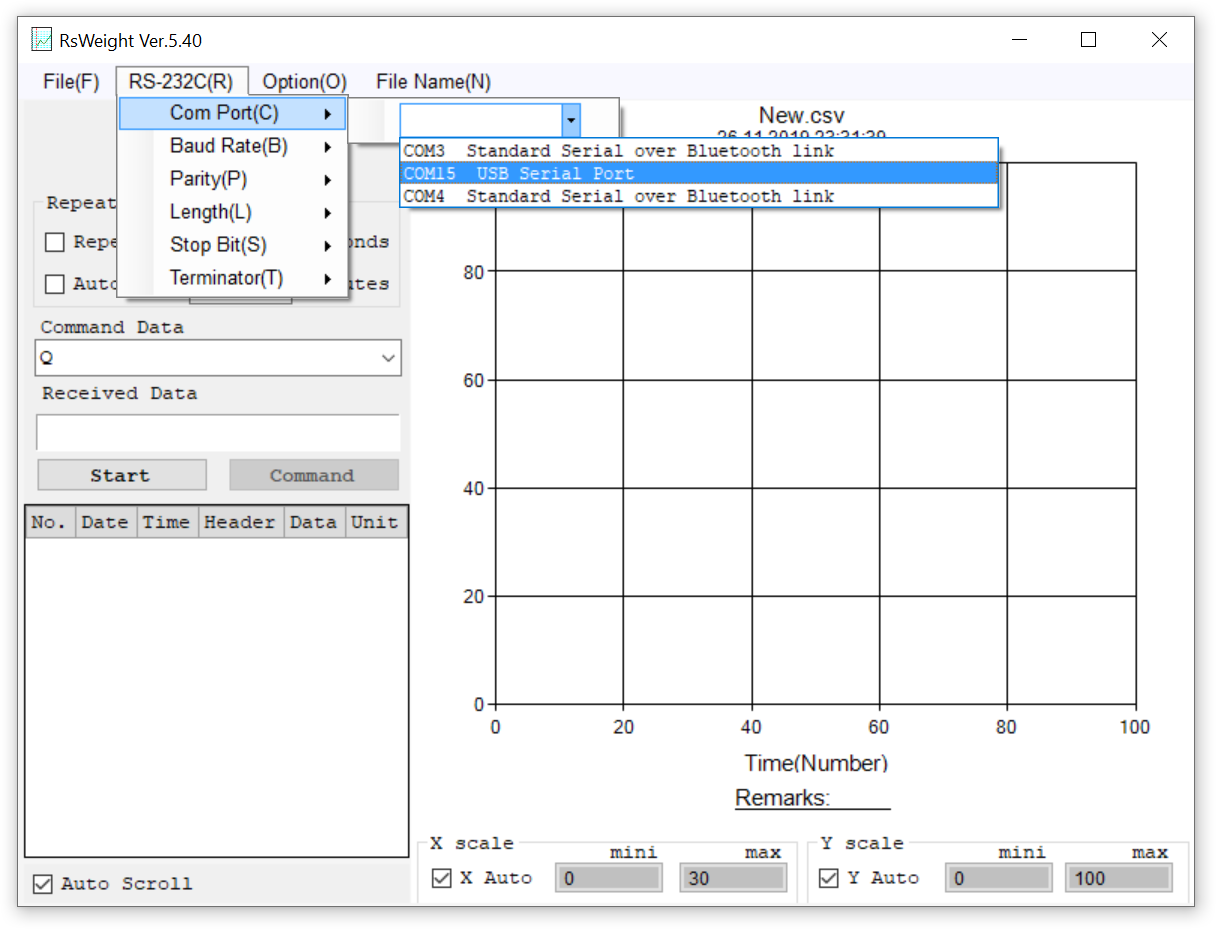
If you’re using a USB to RS-232 converter with FTDI’s chipset, it will show up as a “USB serial port” (as shown above). Converters made by other manufacturers may have slightly different names, but usually they contain the words “serial” and “port”.

The new Apollo GX-AE/A and GF-A balances will be shown as an “AND USB Port for Balance”.

If you’re in doubt, open the Windows Device Manager (under Windows 10, press Ctrl + X, then select Device Manager) and navigate to Ports (COM & LPT):
Ports in Windows Device Manager

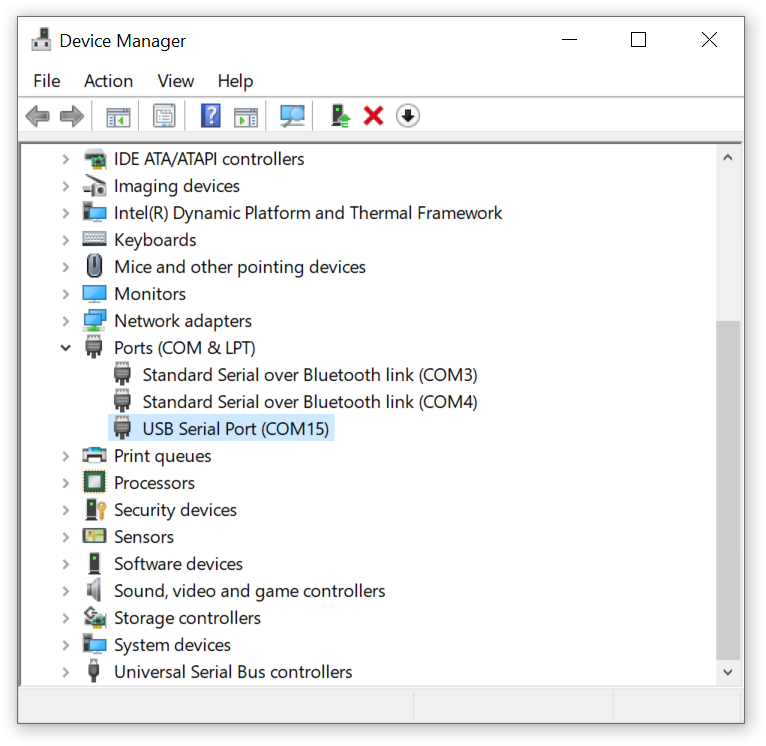
You can then simply unplug the converter (or balance) from your PC and watch which device disappears (and hopefully reappears when you plug it in again). If you cannot find a suitable device, you must resolve this issue before continuing (most likely you don’t have the correct driver installed, see section 2 above).

All other interface parameters are already set to the default values required by (nearly) all A&D scales and balances:

  • Baud Rate: 2400
  • Parity: Even
  • Length: 7
  • Stop Bit: 1
  • Terminator: CR/LF

RsWeight baud rate is set to 2400

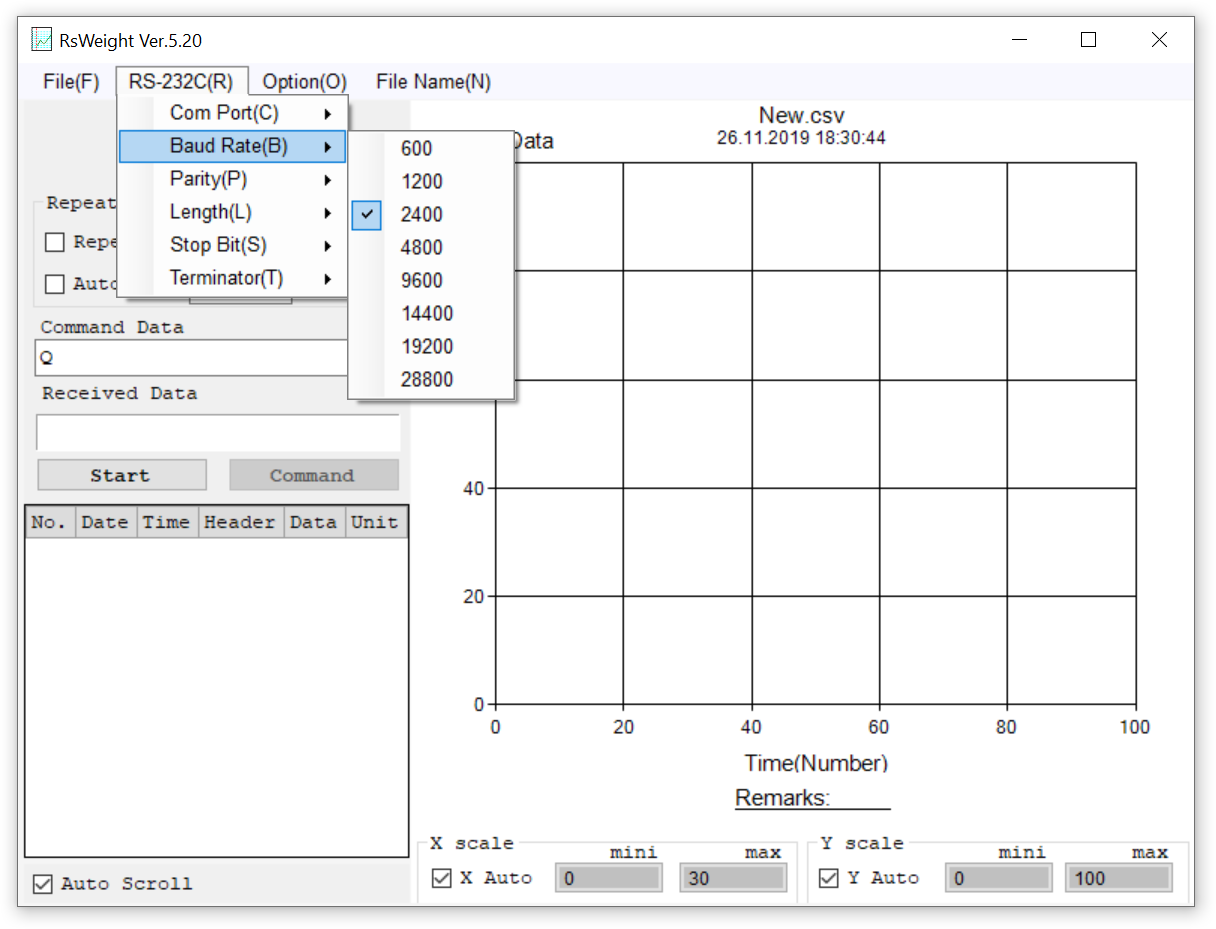
If you’ve changed these settings in the menu of your scale, you need to make exactly the same changes in RsWeight. If you didn’t modify the default settings of your scale, all you have to do in RsWeight at this stage is set the COM port.

5. Start data logging

Press Start in RsWeight, put an object on your balance, wait for the stability indicator to show up in the display and press the PRINT button. The weight will appear in RsWeight:

Weigh received in RsWeight

Note: If you do not want to manually press the PRINT button on your balance, you can either change its data transmission mode or instruct RsWeight to request the weight by checking the Repeat checkbox and setting an interval in seconds. Further information can be found in the manual of your balance and in the RsWeight Operation manual (PDF).

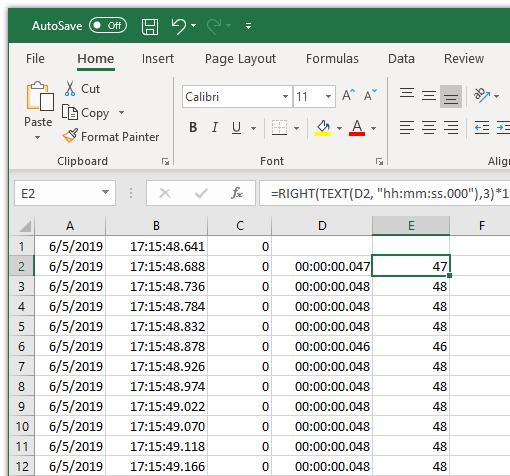
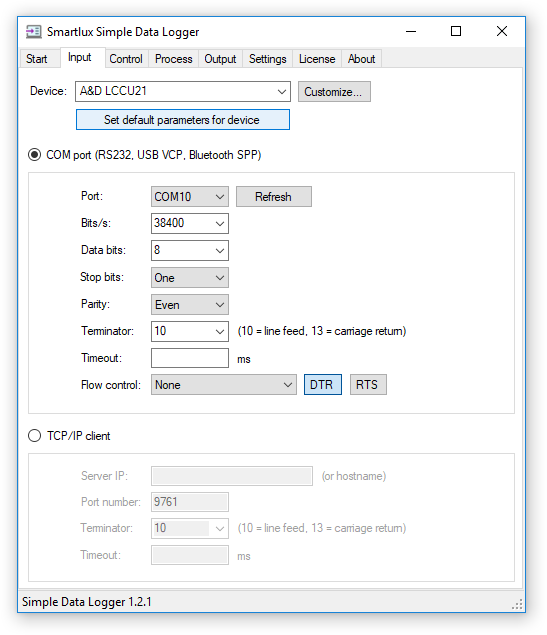
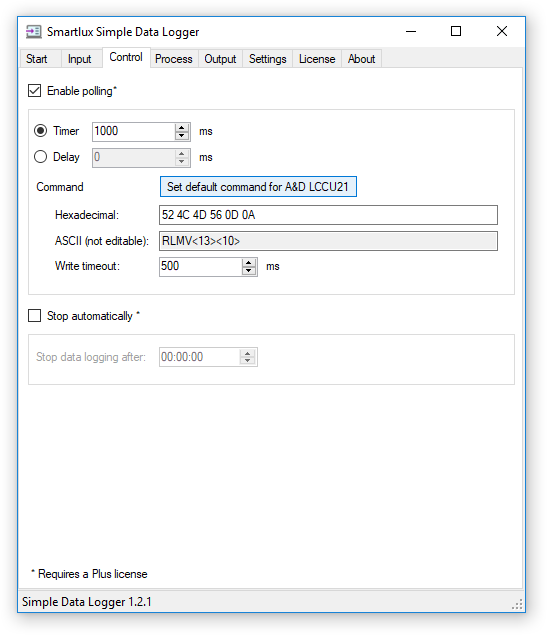
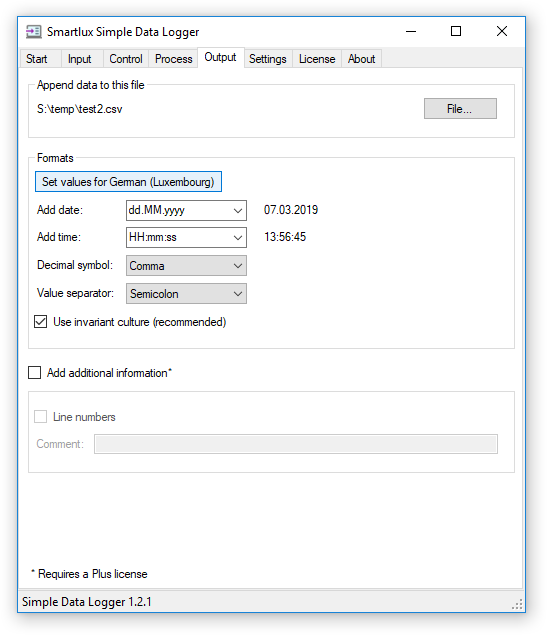
We do not recommend using “stream mode” with RsWeight as the software will eventually become too slow to record all values. You can see this in this screenshot where the balance was sending 20 values/s, but RsWeight slowed down to 4 values/s after a few minutes. If you want to continuously record rates of 10 weight values/s (or more) over several minutes, hours or even days, consider using our inexpensive Simple Data Logger software.

6. Export to CSV

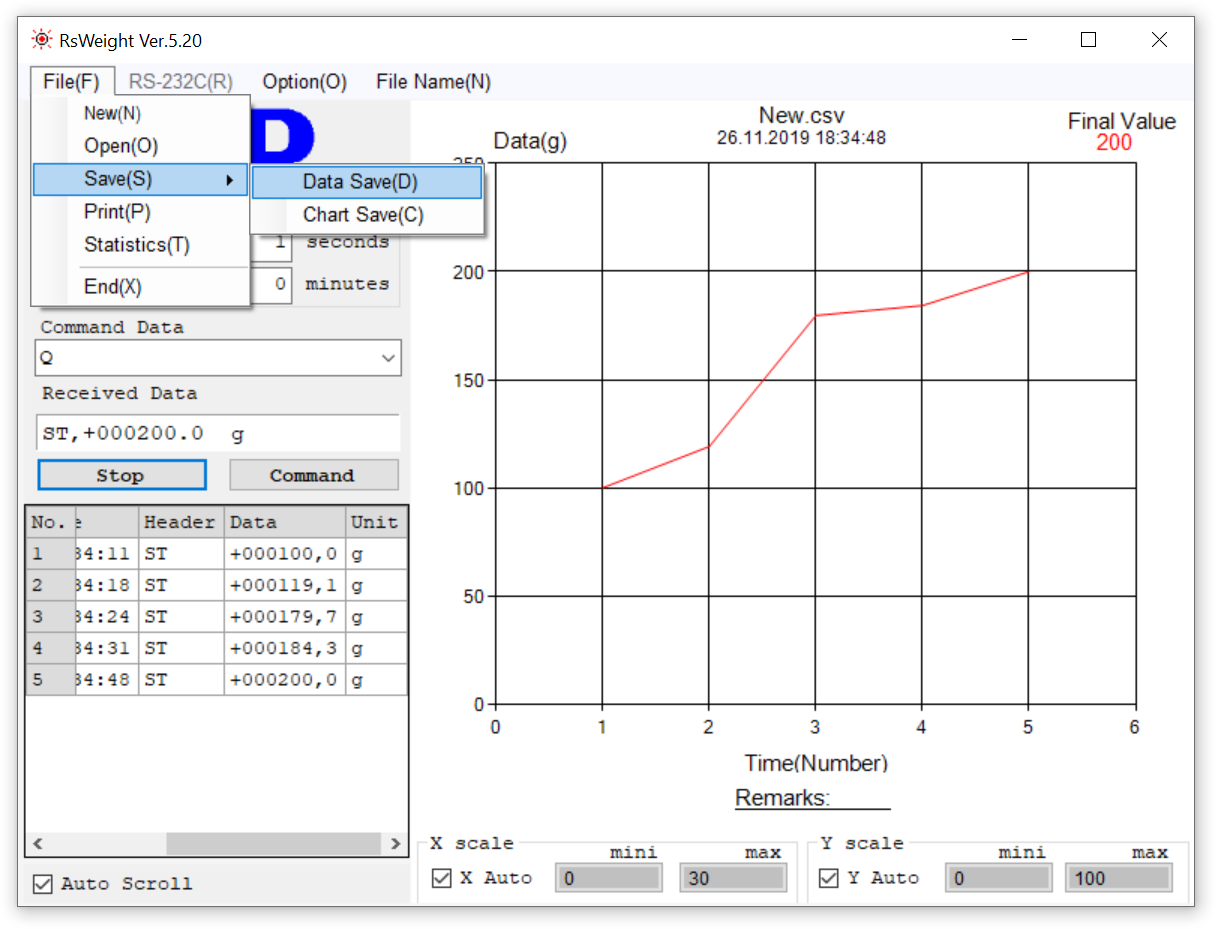
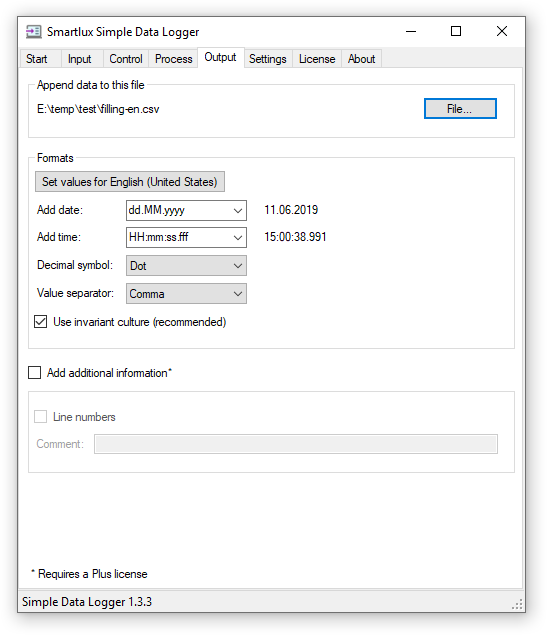
In the Option menu, make sure that the Decimal Point is set correctly for your region (e.g. USA->Dot, Germany->Comma). Then, go to File / Save / Data Save and enter a file name and location:

Save recorded weight as CSV

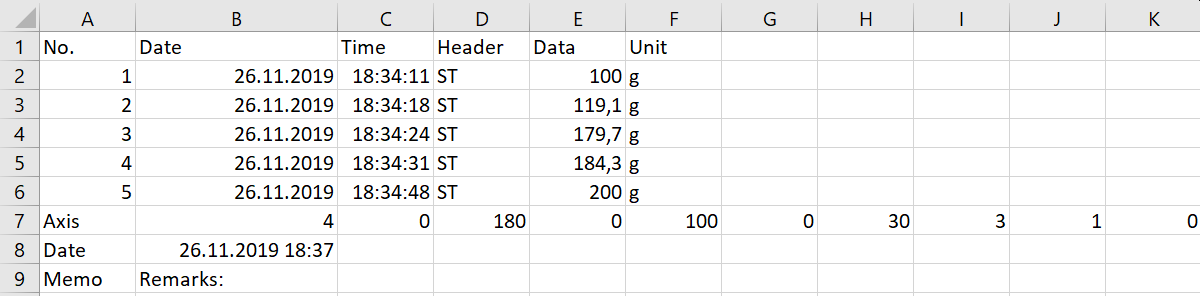
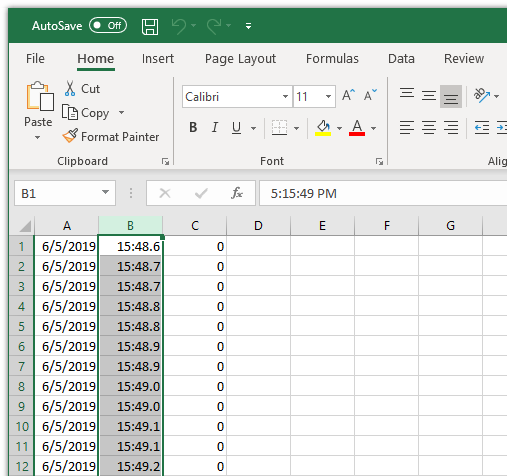
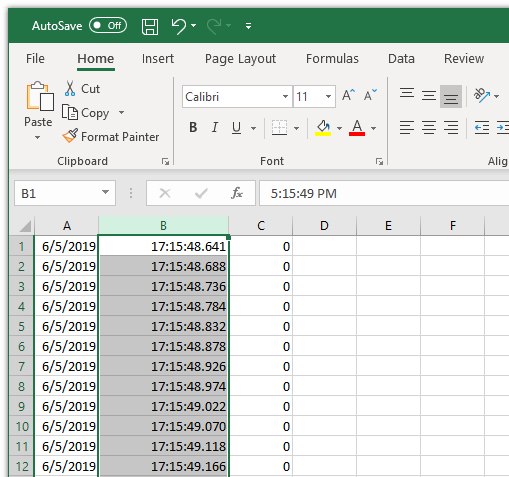
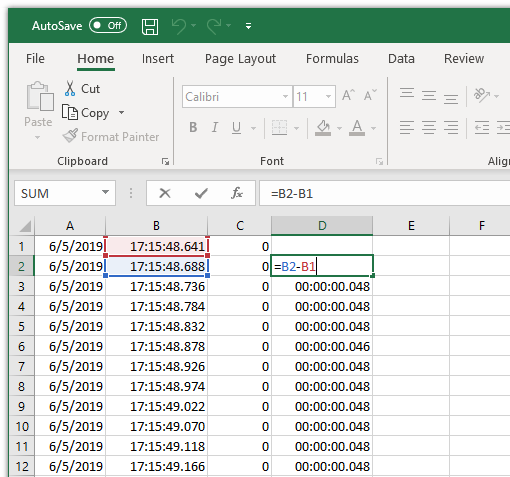
You will be able to open this file in Excel (and other applications) and the data will be neatly arranged in columns (if not, then you probably picked the wrong decimal separator):

CSV file from RsWeigh opened in Excel

What if no weight is received from the scale?

This problem can be difficult to solve because there are many components involved in recording the weight from your scale:

  • The scale or balance,
  • the RS-232 cable,
  • the USB to RS-232 converter (if required),
  • and the RsWeight software.

If there’s something wrong with just one of these items, data transmission will fail. From our experience, the most common issues are:

    • Wrong COM port. The COM port number will be assigned by your PC, so you can’t just copy it from this article. Note that there may be other COM ports present on your system even if you’ve never connected a converter to your PC before. It is absolutely necessary that you choose the right port. RsWeight cannot do this for you, though it does make it easy by showing the full COM port name (since version 5.40).
    • No driver, wrong driver or outdated driver installed for your USB to RS-232 converter or balance. This a particularly common problem on Windows 7. Confirm that the manufacturer’s name and not “Microsoft” is shown under Driver Provider when you open the Device Manager, right-click on the converter, select Properties and switch to the Driver tab:
      USB Serial port driver propertiesIf you suspect that you don’t have the correct driver installed, download it from the manufacturer (see section 2).
    • The scale has not yet stabilized. If you press the PRINT button and the weight is not stable, no data will be transmitted. Depending on the model of your scale, you may be able to change this setting (please consult the manual). Otherwise, just wait until the stability symbol appears.
    • Balance settings have been modified. If the settings of your balance no longer correspond to their default values, data transfer may fail. This applies in particular to settings of the serial interface, such as the baud rate and the data format. Please consult the manual of your balance to ensure that each setting corresponds to the factory setting.
    • Wrong serial cable. A&D scales generally require a straight 1:1 cable, not a crossed (null modem) cable. If you happen to find a cable that “looks like it may work”, check that it is wired correctly (using a continuity tester, you cannot tell how a cable is wired by looking at it from the outside unless you have superpowers).

It’s extremely rare for the RS-232 port on an A&D scale to be defective. We’ve only seen this happen once so far. Before you assume that your scale is defective, please make sure that you’ve excluded all other possible causes.

Additional information is also available from A&D:

If you are unable to record any data from your scale with RsWeight even after carefully following the instructions in this article and in the linked documents, please contact your weighing instruments dealer or A&D.

Please understand that we cannot offer free support if you have not bought your A&D scale or balance from us.

Working with milliseconds in Excel

Milliseconds are not first-class citizens in Excel. There’s no MILLISECOND equivalent to the SECOND function and you will not find a predefined time format that includes hours, minutes, seconds and milliseconds.

This does not mean that Excel cannot process time values with milliseconds. The only requirement is that they are in a format that Excel recognizes. You should also assign a custom format to the cells so that you can easily read the values. I will explain these two aspects in this article and present solutions to common millisecond related tasks and problems. If you’re only interested in a brief summary, jump to the TL;DR at the end.

Note: I’m using US region settings for this article. Other regions may require different formats, e.g. “hh:mm:ss,000” for Germany (with a comma instead of a dot).

Time formats with milliseconds recognized by Excel

Internally, Excel stores time values as fractions of a day (24 hours). This means that 12h are represented as 12÷24 = ½ = 0.5 (half a day) and 3h as 3÷24 = 0.125. In this representation, 1ms is only a tiny value: 1ms ÷ (24h × 60min/h × 60s/min × 1000ms/s) = 1÷86400000 ≈ 0.000000011574074 (compare this to the numeric precision of Excel).

This makes the calculation of time differences very easy, but entering values in this way is not particularly user friendly. Fortunately, Excel also recognizes the following format and similar variants:

hh:mm:ss.000

Example: “01:23:45.678” stands for one hour, 23 minutes, 45 seconds and 678 milliseconds. You do not have to type leading zeros (or trailing zeros in the milliseconds part).

Numbers entered like this or read from a file in this format are converted to fractions of a day. However, they are not displayed correctly until you assign a corresponding custom format to the cells, as explained below.

Custom cell format with milliseconds

Practical example

Click here to download a CSV file created by our data acquisition software Simple Data Logger during a fill weighing operation using an A&D GX-A precision balance. The software was configured to record the date, time (with milliseconds) and weight:

Time with milliseconds in weight recording software
The time format pattern in this software is slightly different from the one used by Excel. To the right of the “add time” field, you can see that it produces the desired output.

After opening the CSV file in Excel, you will notice that the time is not displayed correctly:
CSV file opened in Excel, date, time (not formatted correctly) and weight

This can be fixed by assigning the following custom format to the cells (select the column containing the time, right-click and choose “format cells”):

[hh]:mm:ss.000

The square brackets indicate that this is an “elapsed time” format that can display hourly values equal to or greater than 24h. Once applied, the time values are shown in the desired format:

Date, time with milliseconds and weight shown correctly in Excel

Common tasks when using milliseconds in Excel

Calculating time differences

Thanks to the numeric format used internally by Excel, you can perform all kinds of calculations with time values. To calculate a time difference, simply subtract the later time from the earlier one:

Calculating with milliseconds in Excel

If the result consists of “############” instead of the expected time difference, there can be several reasons:

  • You may need to apply the same custom [hh]:mm:ss.000 format as above to the results.
  • The result is a negative value. Excel does not like negative time values, but there are some workarounds.

Be careful with date changes! The simple time difference formula used above will fail at midnight. Fortunately, dates are internally stored as whole numbers and you can therefore simply add the date and time values before performing the subtraction as I’ve explained here.

Show milliseconds only

Excel does not have a MILLISECOND function to return only the milliseconds of a time value. You can use the following formula instead:

=RIGHT(TEXT(D2, "hh:mm:ss.000"),3)*1

This takes the 3 rightmost characters (the milliseconds) from the D2 cell and multiplies them by one to ensure the result is treated as a number (not text).

Format the cells in the result column as a number without decimal places and you will see that only the milliseconds have been extracted:

Milliseconds extracted from time in Excel

You can then easily perform calculations such as MIN, MAX, STDEV.P, etc.

Conversion of time values into milliseconds

If you want to convert entire time values to milliseconds instead of just extracting the milliseconds part, there are two approaches that should lead to the same result.

You can use the built-in HOUR, MINUTE and SECOND functions together with our MILLISECOND function replacement (see above) to convert a time value (in cell D2):

=HOUR(D2)*3600000+MINUTE(D2)*60000+SECOND(D2)*1000+RIGHT(TEXT(D2, "hh:mm:ss.000"),3)

There is also an elegant alternative to this solution: You can simply multiply the time value by 86400000 to convert it into milliseconds. This works because of the internal numeric format used by Excel where 1 is equal to 24h = 24h × 60min/h × 60s/min × 1000ms/s = 86400000ms.

Use an easier format to manually enter times with milliseconds

The time values with milliseconds used for the examples above were already available in the “hh:mm:ss.000” format required by Excel. But what if you must enter many time values manually? Maybe you prefer a format that only uses dots so you can keep your hand on the numeric keypad, e.g. 1.25.54.010 instead of 1:25:54.010.

For Excel to recognize these values as times, they must be converted to the “hh:mm:ss.000” format. However, if you use the SUBSTITUTE function to replace all dots with colons, you wont preserve the last dot. The solution is to limit SUBSTITUTE to replace only the first occurrence of a dot and then apply it again to replace the second dot, leaving the last one intact. The required formula looks complicated but is actually simple (it assumes the value you want to transform is contained in cell A2):

=SUBSTITUTE(SUBSTITUTE(A2,".",":",1),".",":",1)

Please try it out before you manually enter hundreds of time values using the dot format. It worked fine for me:

Excel time with milliseconds entered with dot

TL;DR (too long, didn’t read)

  1. Make sure that your time values are available as hh:mm:ss.000, e.g. “01:23:45.678”.
  2. Assign the following custom format to your cells: [hh]:mm:ss.000.

Reading force measurement values from A&D’s LCCU-21 button load cell

A&D’s LCCU-21 USB subminiature button load cells are available in capacities ranging from 100 N to 1 kN. Their tiny size makes it easy to incorporate them into your own machinery or test equipment. They are connected to an A/D converter with a USB interface, enabling you to quickly build PC-based force measurement and data acquisition systems at a very affordable price.

A&D LCCU21N100 usb button load cell

LCCU21 device profile in Simple Data Logger

As an alternative to A&D’s free WinCT-DLC application, you can also use these load cells with the most recent release of our Simple Data Logger software (SDL v1.2.1). In this article, I’ll show you how to configure SDL to request data from the load cell in user-defined intervals (polling).

The LCCU-21 button load cell has two data transfer modes: continuous transfer of up to 100 values/s and a command/reply mode. Currently, only the second mode is supported by Simple Data Logger (continuous mode has to be started and stopped by sending special commands to the LCCU-21, which is something that will be available in a future version of SDL).

Force measurement using A&D’s LCCU-21 button load cell and Simple Data Logger

1. Download and install Simple Data Logger.

2. Go to the license tab and enter a license key (required for the polling function). You can purchase license keys from FastSpring through a completely automated process (including a “90 days” license for only US$5). You can also contact us if you require a free trial license or apply to become a reseller if you want to sell our software to your customers.

3. In the input tab, set the device to “A&D LCCU21”, then click on set default parameters for device. This will set all interface parameters for you. The only thing left to set is the (virtual) COM port which appeared on your PC after connecting the LCCU-21 to a USB port (see this PDF document for further information):
A&D LCCU-21 usb button load cell: configuration in input tab

5. Switch to the control tab, enable polling and set the timer to a value that makes sense for your application. Click on set default command for A&D LCCU21; this will automatically enter the “RLMV” command which will be sent to the USB button load to request measurement data:
Set default command for A&D LCCU-21 usb button load cell

6. Select a file in the output tab. Click on the set values button to automatically set the values below for your region so that you can easily open the CSV file in Excel later. If you want to record the time with milliseconds, choose the appropriate format from the drop down list or enter it manually:
CSV file format settings

7. Click on the start button in the start tab to connect to the LCCU-21 USB button load cell and to start sending the polling command. Commands and replies are shown in the event log. Captured measurement values appear in blue and are written to the CSV file. Click on stop to stop data acquisition and to close the file:
Data acquisition from A&D LCCU-21 usb button load cell

Notes on the LCCU-21 button load cell

  • I don’t have the LCCU21N100 I used for testing anymore, so if you have any questions about it, please contact A&D.
  • The product brochure (PDF) contains several creative application examples, including one where load is applied by pressing the button load cell with a finger. When I tried this, it worked, but not very well: I found that it is impossible to press only the load sensitive surface (though maybe that’s not an issue for people with smaller fingers). It is therefore advisable to “apply load to the load cell through a rigid surface” as stated in the user manual.

Further information