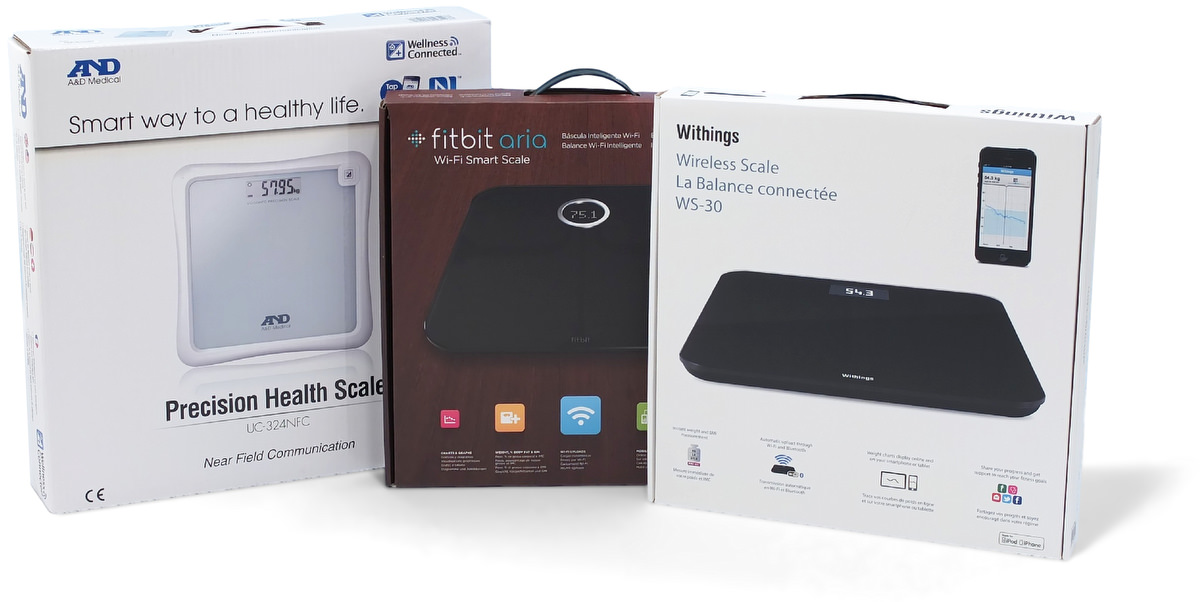
Are smart scales accurate weighing instruments or just simple bathroom scales with expensive connectivity features? To find out, I tested the Withings WS-30, Fitbit Aria and A&D UC-324NFC using class M1 weights.
 This image by digitalscalesblog.com is licensed under a Creative Commons Attribution 4.0 International License
Preparation
Each of the scales had not been used before and was configured as instructed by the manufacturer. This included signing up for an account with Withings and Fitbit. In the case of A&D’s UC-324NFC, I took advantage of a function available in the Wellness Connected app which let me “calibrate” the scale by entering the local gravitational acceleration.
The scales were tested under similar conditions with a stable temperature of around 22°C and were placed on a flat, hard surface. The Withings and Fitbit scales were left alone for a night after the initial configuration as I wasn’t quite sure how they determine the zero value: unlike older electronic scales, you don’t have to switch them on and wait for them to show ‘zero’, instead, you step right on (the UC-324NFC determines the zero point after you step off).
Test procedure
I used 20kg weights to test the scales at 40, 60, 80, 100 and 120 kg. This procedure was repeated 3 times for each scale (I did a lot of weight lifting that day).
 This image by digitalscalesblog.com is licensed under a Creative Commons Attribution 4.0 International License
Results
The first column gives you the nominal weight (in kg) and the next three are the values as shown by the scales.
Withings WS-30
| 40 | 40.2 | 40.2 | 40.2 |
|---|---|---|---|
| 60 | 60.3 | 60.3 | 60.3 |
| 80 | 80.4 | 80.3 | 80.3 |
| 100 | 100.3 | 100.4 | 100.4 |
| 120 | 120.4 | 120.4 | 120.4 |
Fitbit Aria
| 40 | 40.2 | 40.2 | 40.1 |
|---|---|---|---|
| 60 | 60.2 | 60.2 | 60.2 |
| 80 | 80.2 | 80.2 | 80.2 |
| 100 | 100.3 | 100.3 | 100.3 |
| 120 | 120.3 | 120.3 | 120.4 |
A&D UC-324NFC
| 40 | 39.95 | 39.95 | 39.95 |
|---|---|---|---|
| 60 | 60.00 | 59.95 | 60.00 |
| 80 | 80.00 | 80.00 | 79.95 |
| 100 | 100.00 | 100.00 | 100.00 |
| 120 | 120.00 | 120.00 | 120.00 |
As you can see, A&D’s UC-324NFC was the most accurate scale, never deviating by more than 50g from the true value. Its 50g resolution and gravity compensation function certainly paid off.
However, the Fibit and Withings scales did a great job, too. Looking at the measurement results in each row, you’ll see that they are either identical or off by just one scale interval (100g). We can therefore say that these scales were slightly less accurate, but still very precise* (or that their repeatability was still excellent). As far as your body weight is concerned, you’ll generally be less interested in absolute values and more in tracking changes (“am I loosing or gaining weight”) and these scales would be perfectly suitable for this purpose. Nevertheless, I was a bit surprised that Fitbit and Withings didn’t use the location I had entered during account creation to adjust the scale for the local gravity acceleration. This would most likely have improved their accuracy.
Overall, the results are very good. As far as I can tell from this test, you’re not just paying for the “smart” features, you get accurate scales, too.
Further information / where to buy:
- Withings website – amazon.com – bestbuy.com – newegg.com – amazon.co.uk – amazon.de
- Fitbit website – amazon-com – bestbuy.com – amazon.co.uk – amazon.de
- A&D Wellness Connected UK website – amazon.co.uk – amazon.de
Disclosure:
- Some links above are affiliate links.
- My company used to sell A&D’s UC-324NFC in our German scales shop, but we don’t anymore. The Withings WS-30 and Fitbit Aria were purchased at retail prices, A&D’s UC-324NFC was purchased with a dealer discount.
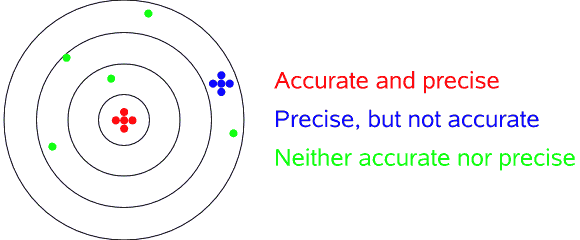
*Meaning of accuracy and precision (as used in this article):
[related_posts_by_tax]