The scales are equipped with an RS-232 interface and can be connected to a PC for data acquisition (if necessary via an adapter from RS-232 to USB). They are known as “Everest EK/EW compact balances” in the US.
Applications such as the following can be used to capture the weight:
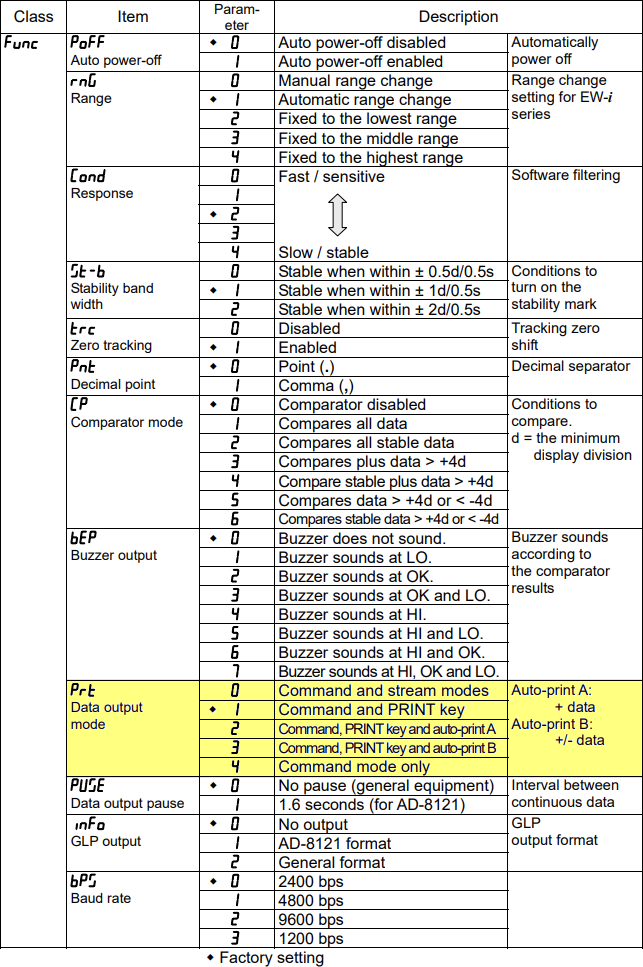
EK-i and EW-i scales support the following transmission modes:
Prt 0 – stream mode: continuous transmission of weight with approx. 10 values/s,
Prt 1 – PRINT key (default setting): transmission when pressing the PRINT key on the scale,
Prt 2 – auto-print A (positive values only): automatic single transmission when the weight is stable (return to zero required before next transmission),
Prt 3 – auto-print B (positive and negative values): automatic single transmission when the weight is stable (return to zero required before next transmission),
Prt 4 – command mode only: request-response mode, the computer sends a command to the scale and it responds with the weight value.
Notes:
The display flashes briefly (in Prt 1, 2 and 3) to confirm the data output.
Commands from a connected computer can be sent in all modes.
The PRINT key is active in all modes except Prt 4.
There is no interval mode. If you want to capture the weight in certain intervals (e.g every minute), you need a software that supports polling with a timer (or you could set the scale to stream mode and discard most values).
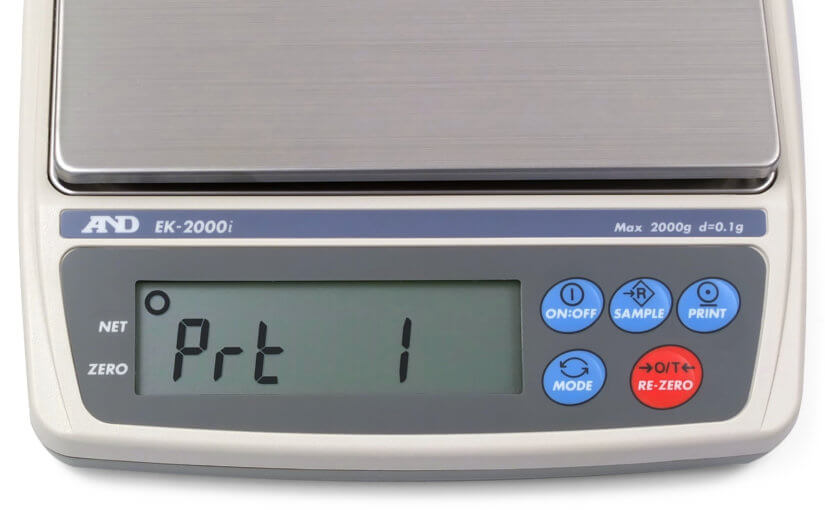
These data output modes can be found in the Func class of the scales’ menu:
Excerpt from the user manual (see link below)
Changing the transmission mode
Turn on the scale.
Press and hold the SAMPLE key until the scale displays “P-3.00” (or a similar value). The scale shows “Func” next.
Press the PRINT key to enter the function settings menu. The first setting “PoFF” is displayed.
Press the SAMPLE key 8 times to enter the “Prt” setting. By default, “Prt 1” is set.
Set “Prt” to the desired value by pressing the RE-ZERO key (see description above).
Confirm the setting with PRINT. The balance displays “End” briefly and then “CP Hi”.
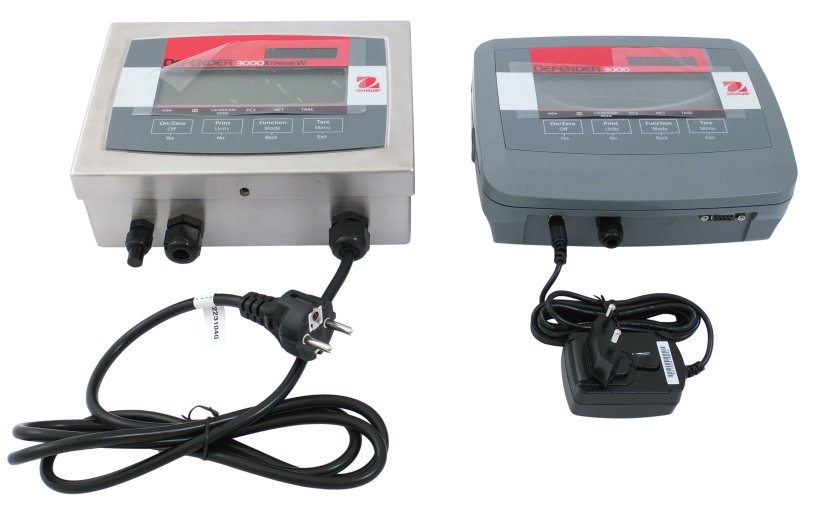
The Ohaus Defender 3000 series scales with T32XW and T31P indicators can send the weight via the standard RS-232 interface. There are several ways to trigger data transmission:
By pressing the print button1 on the scale,
automatically at each stable weight,
continuously2 at a rate that depends on the baud rate (approx. 50 values/s with standard setting 9600 bit/s; 100 values/s with 19200 bit/s)3,
in intervals from 1 s to 3600 s,
on demand via the interface with a suitable command (bidirectional communication).
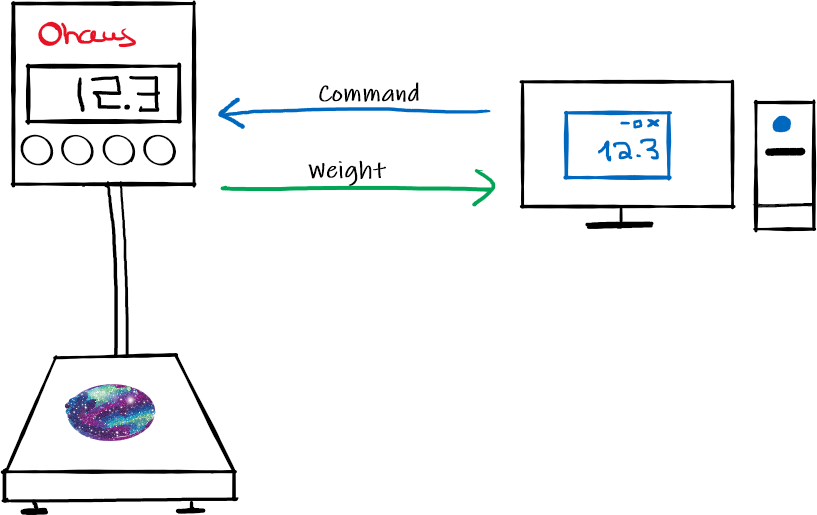
In this article I’ll describe the 5th method: a device connected to the balance via the RS-232 interface (e.g. a computer, microcontroller, PLC, etc.) sends a command to the balance and it responds with the weight:
Made by me with Microsoft Whiteboard, an application that fits my limited artistic talent
Notes: 1 Originally, scales were more often connected to printers than to computers, hence the name “Print”. 2 Continuous transmission (3) is not possible with verified (legal-for-trade) scales. 3 The actual measuring rate (conversion rate) is always approx. 16 values/s.
All explanations in this article refer to the current (October 2021) generation of the Ohaus Defender 3000 with the T32XW indicator with firmware 1.03 (left in photo above) and the T31P indicator with firmware 1.14 (right in photo).
Instruments with different firmware as well as older or possible future newer Defender 3000 models may behave differently. For verified (LFT) scales, some features are disabled (also, legal requirements must be observed when connecting verified scales to computers).
Commands to request the weight and data format of the response
To send commands to the scale and to view the reply, you can use any serial terminal software (I’ll be using HTerm). No settings need to be changed on the scale: by default, data transmission by pressing the print key (1) and requesting the weight via the interface (5) is supported.
Important: In HTerm, be sure to select “CR” or “CR-LF” in Send on Enter under Input Control so that all commands sent to the scale are terminated with these characters (required).
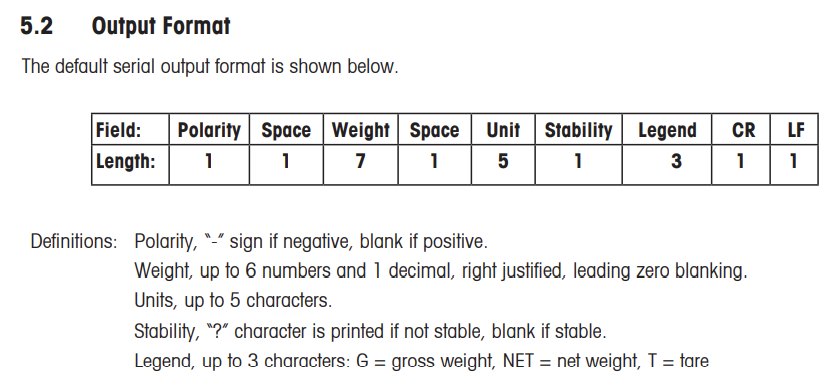
The following commands are listed in the user manual (PDF), I’ll discuss them in detail below:
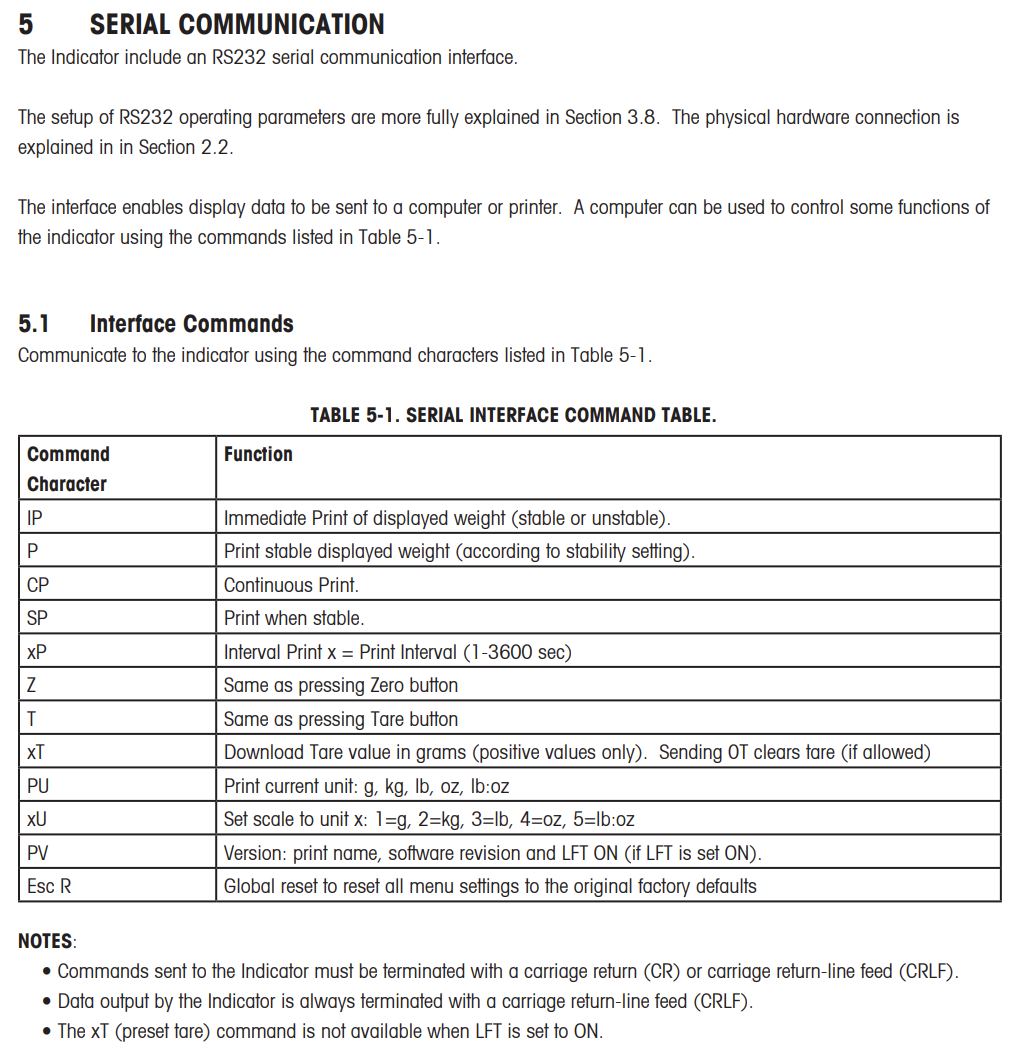
SP command (Print when stable) – does not work as expected
If the scale sent the weight as soon as it stabilized after receiving SP, this command would be very interesting. However, the Defender 3000 does something completely different: it sets the Print > Stable setting to “On” and responds with “OK”:
As far as I know, this setting cannot be changed back to “Off” with any command (except the Reset command). It must be changed directly on the indicator in the Print menu.
This command is unfortunately useless for retrieving the weight. On other scales, such as the Ohaus Defender 5000, it works as expected.
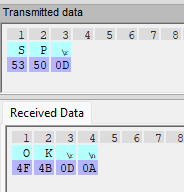
P command (Print)
The P command corresponds to pressing the Print button on the scale. Therefore, the already mentioned stability setting (Print > Stable) is observed:
Print > Stable: “On”
If Print > Stable is set to “On”, the weight is only sent if it is stable (an asterisk * appears in the upper left corner of the display when the weight is stable). If the scale receives the P command when the weight is unstable, it does not respond (and the display briefly shows “–NO–“):
Note: For verified scales, Print > Stable is always set to “On” and cannot be changed.
Print > Stable: “Off
If Print > Stable is set to “Off”, the scale always responds to P with the weight. Unstable weights are marked with a question mark (see below).
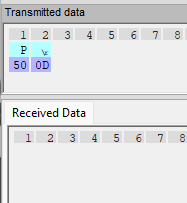
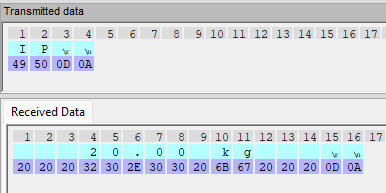
Output format of the scale when replying to the P command
The description in the manual is largely correct:
The 7 characters for the weight correspond to the 6 digits of the scale display plus the decimal point. The legend is only used for the gross, net and tare weight (deactivated by default) and is otherwise omitted.
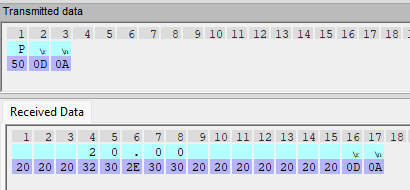
Example 20.00 kg, stable:
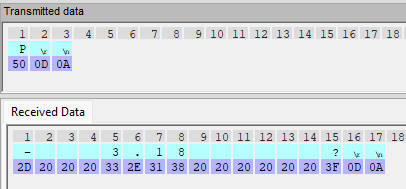
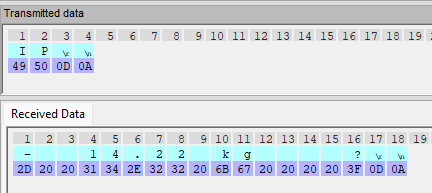
Example -3.18 kg , unstable:
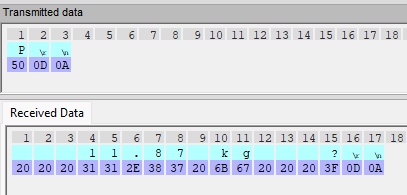
Example 11,87 kg, unstable, with unit (Print > Content > Unit: “On”):
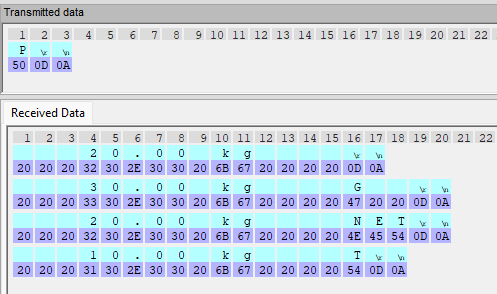
Example with gross, net and tare weight as well as unit (all entries in the Print > Content menu set to “On”), stable:
Note: The scale sends the lines with the net weight and the tare value only if the latter is not zero (i.e. if the tare function was actually used).
Same example as above, except that the tare value was set with “1000T” via the interface:
The only difference is “PT” (pretare) instead of “T” in the last line.
IP command (Immediate Print)
The IP command can be used only with non-verified scales. After receiving the IP command, the scale sends the weight immediately, whether it is stable or not. Moreover, the response is not influenced by settings in the scale’s menu, so Print>Stable and Print>Content do not play any role.
Output format of the scale when replying to the IP command
For a stable weight, the response consists of 16 characters:
If the weight is unstable, two characters are added (space and question mark at the end):
Other commands
CP (Continuous Print)
Activates the continuous transmission of the weight (possible only with non-verified scales), see point 3 at the beginning of this article. With 0P (zero + P) this can be deactivated again. The data format is similar to those described above.
Caution: The high data rate can overload some programs. In addition, the scale is sometimes falsely recognized as a serial mouse by Windows if it sends values continuously already at system startup (the mouse pointer then jumps wildly across the screen and your customer may call you and complain that your scale made his PC go crazy).
xP (Interval Print)
Transmission every x seconds (with x from 1 to 3600), send 0P to disable. The data format is the same as the P command.
Z (Zero)
For zeroing the scale, corresponds to pressing the Zero button on the indicator. The allowed range for executing the command is controlled by the Setup > Zero setting (2% or 100% of the capacity).
Note: The scale always responds with “OK”, even if the allowed range has been exceeded and the command could therefore not be executed (and the display showed “–NO–“).
Caution: If Setup > Zero is set to “0-100”, the maximum capacity could be unintentionally exceeded (as the zero range is not subtracted from the capacity).
Use the Z command to eliminate small residual values. It is not intended as an alternative to the tare command (see below).
T (Tare)
Same as pressing the Tare button. Suitable for “zeroing” the weight of a container or weighing individual components of a recipe.
The tare function can be deactivated by sending 0T (zero + T). The scale will then show the gross weight again instead of the net weight (only possible via this command, not via a button on the indicator). 0T is probably not supported by verified scales (I haven’t tried this out yet).
Note: If the tare function cannot be executed (because there is no object on the scale), the scale will still respond with “OK”, but will show “–NO–“in the display.
xT (Pre-tare)
Sets x as a pre-tare value, where x must be specified in g. Not possible with verified scales.
Example:
PU (Print Unit)
The scale responds with the currently used unit (without blank spaces, see example under xU).
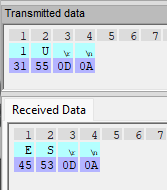
xU (Unit)
Changes the current unit, 1U=>g, 2U=>kg, 3U=>lb, 4U=>oz, 5U=>lb:oz.
Important: In order to set a unit, it must have been activated in the menu of the scale under Mode > Unit. Otherwise, the scale responds with “ES” instead of “OK”:
Verified scales may not support all units (this depends on your local regulations).
Example switching from kg to g:
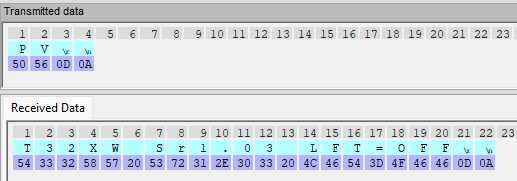
PV (Print Version)
The scale responds with the type of indicator (T32XW or “Defender 3000” for T31P), the firmware version (Sr=Software Release) and the “legal-for-trade” setting (“ON” for verified scales, “OFF” otherwise). With this command you can easily check if your scale uses the same firmware as my test unit.
Example T32XW:
Example T31P:
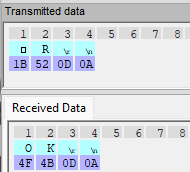
<ESC> R (Reset)
Resets all settings to the factory defaults. In my tests, some settings were only applied after a restart. I see no reason to use this command during normal operation (though – unlike on the Ranger 3000 and 4000 – it fortunately didn’t seem to reset anything in the CAL menu).
Example:
Summary of how to request the weight from an Ohaus Defender 3000 scale
The IP command is the simplest way to retrieve the weight (with the unit) from the Defender 3000. However, it cannot be used with verified scales.
Alternatively, the P command can be used, which is equivalent to pressing the Print button. It is influenced by the Print > Stable setting (send only stable values) and Print > Content setting (scope of transmitted data and unit).
SP is not a command to retrieve the weight, even if the description in the manual suggests this.
The format of the scale’s response differs slightly depending on the command (I don’t know why). I therefore recommended not reading a fixed position from the response string, but searching for the first number instead (which will be the weight).
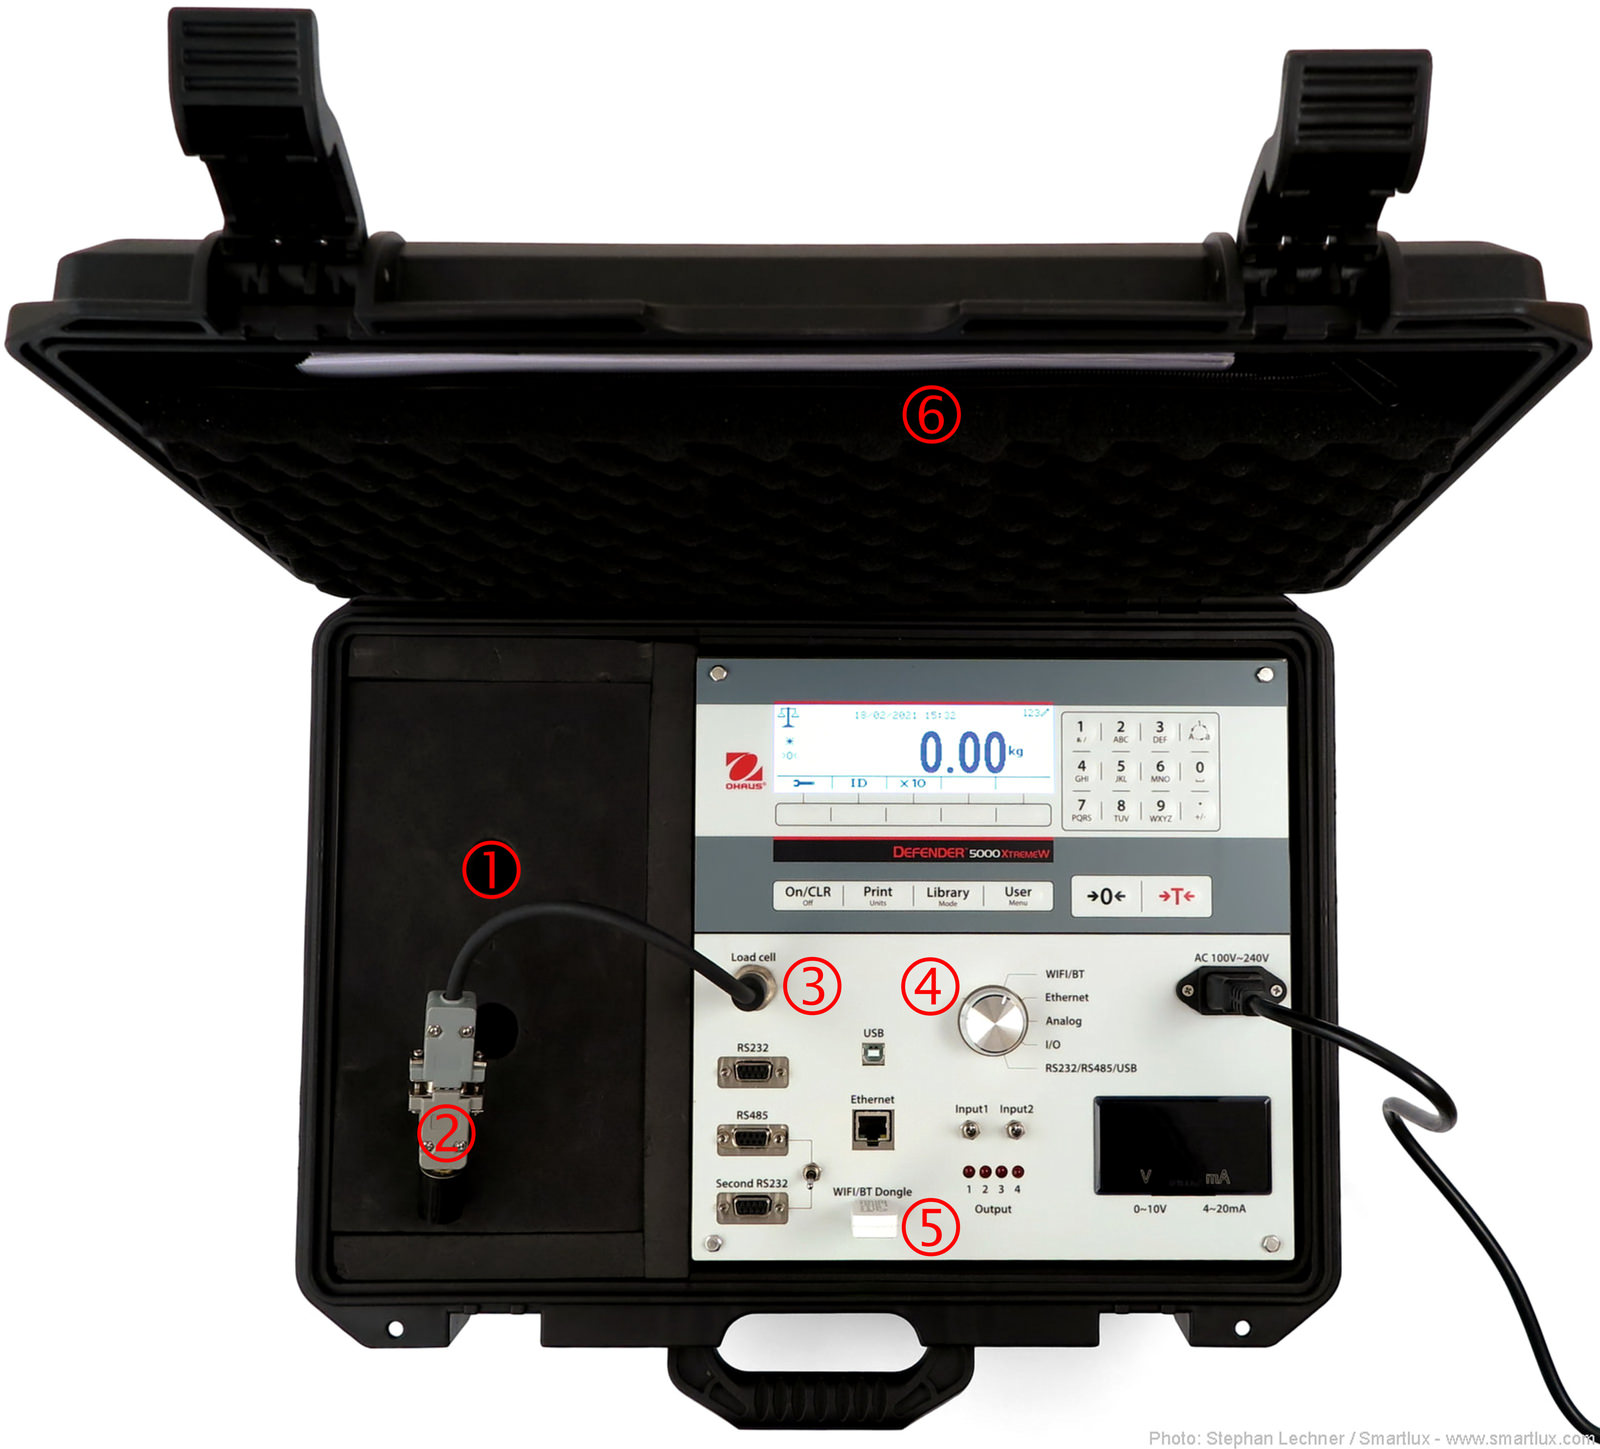
The demo kit allows you to easily test the many interfaces available for the Ohaus Defender 5000 indicator. Its sturdy case is well suited for shipping.
Follow these steps to start using it:
The required components and cables can be found in the compartment on the left side (1).
Connect the load cell simulator (2) (3).
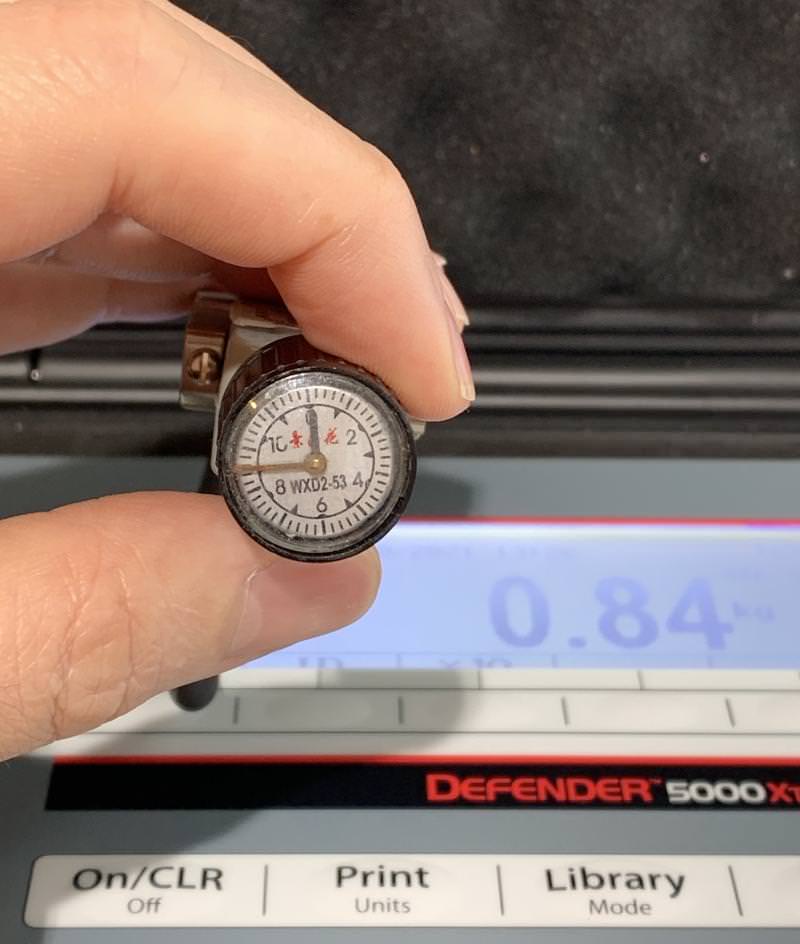
This device simulates the load cell that is normally installed in the weighing platform. Make sure that the pointers on the gauge are at 0, but do not turn on the scale yet.
Set the selector knob (4) to the interface you want to test (e.g. WiFi/BT).
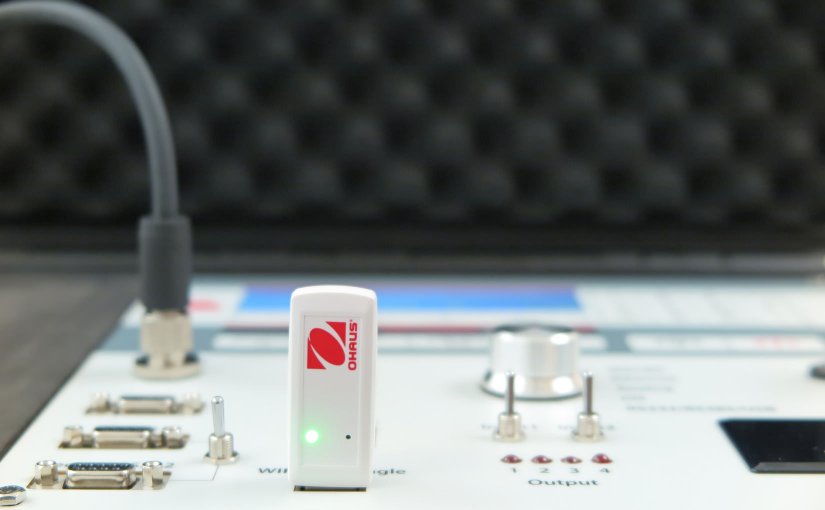
If necessary, plug in the WiFi/Bluetooth dongle (5).
Connect the device to AC power and switch it on.
Turn the load cell simulator counterclockwise to increase the weight:
The configuration of the interface is done in the menu of the scale. Printed instructions are included in the case (6).
When using a WiFi or wired Ethernet connection, the device acts as a TCP server. By default, the IP address is assigned automatically (DHCP). WiFi uses port 6060 and Ethernet port 9761.
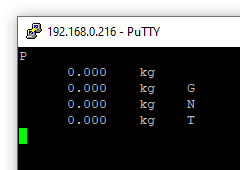
After establishing a connection as a TCP client (e.g. using PuTTY), you can request the weight by using one of the commands listed in the manual. The “P” command corresponds to pressing the Print button on the scale. The device will answer using the default template:
This template can be changed in the menu. The menu also allows you to select a different capacity or graduation.
Note: A micro SD card is included in the device, but it cannot be easily accessed.