RS-232 has been around since the 1960s, so it seems appropriate to start this article with a communication method that’s even older: the tin can phone.
Image generated by ChatGPT/DALL·E 3 (modified)
The kid on the left is speaking into a can held in front of their mouth (transmitting data, TD), while the other is listening through a can held to their ear (receiving data, RD).
To enable both kids to speak (TD) and listen (RD) at the same time, they would require a second set of cans connected by a string, represented by the red arrow1. Let’s also mark the ground (GND) in green:
Image generated by ChatGPT/DALL·E 3 (modified)
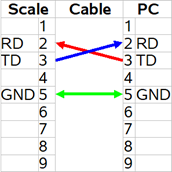
At this point, the illustration looks similar to what you might find in the RS-232 section of your scale’s user manual2:
To establish bidirectional communication with this scale, you would need to connect the transmit data pin (usually called TD or TXD) to the receive data pin of your computer (RD or RXD) and vice versa. Additionally, it’s essential to connect the ground pins (GND) for reference3.
Although this seems simple, attempts to establish communication with a scale using RS-232 often fail at this basic stage.
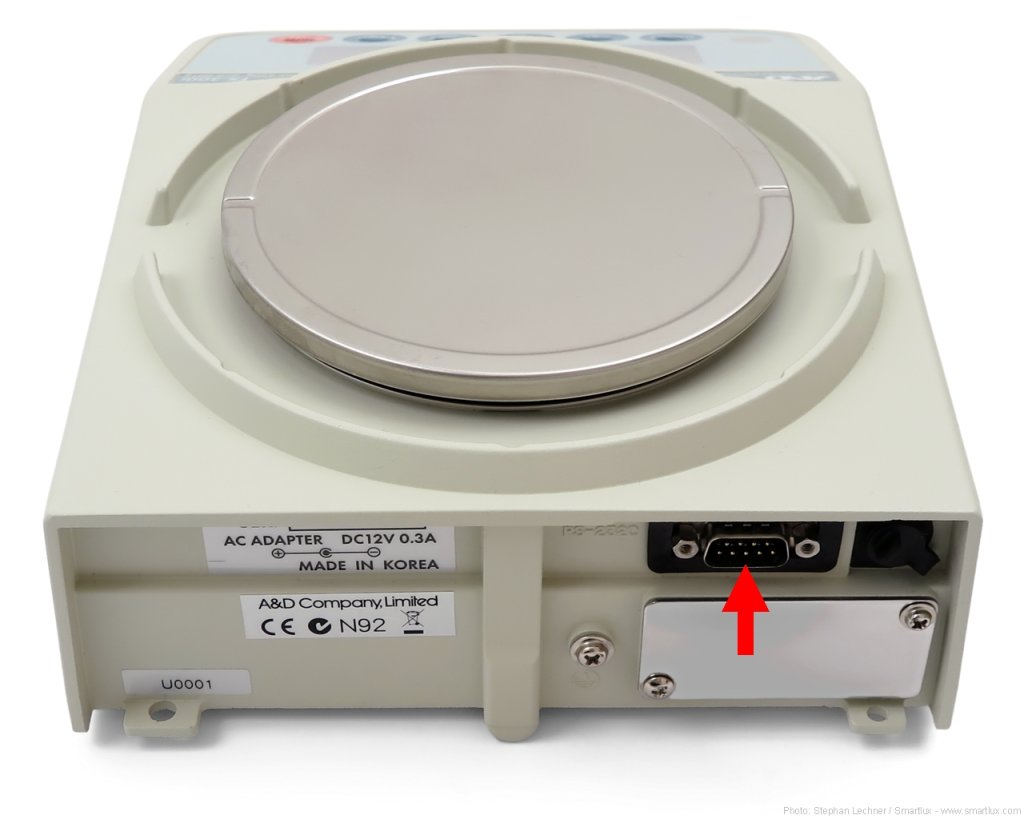
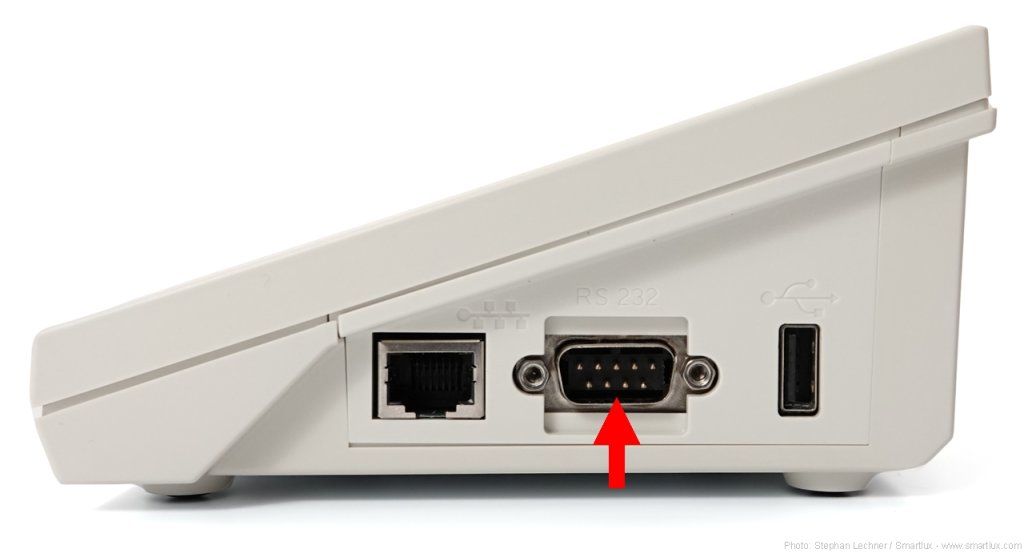
To understand why this is such a common problem, take a look at the photos of the RS-232 interface of A&D’s popular FX-120i balance and Radwag’s PUE C32 weighing indicator:
RS-232 interface on A&D’s FX-120i precision balanceRS-232 interface on Radwag’s PUE C32 weighing terminal
Both weighing instruments have a male D-sub port with 9 pins (DE-9M, frequently but incorrectly called DB-9M)4. You might therefore think that they can use the same cable. You would be wrong, as their pinout is not identical:
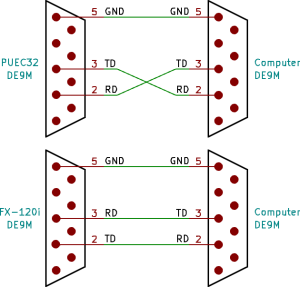
RS-232 wiring diagram
Radwag’s PUE C32 receives data (RD) on pin 2 and transmits it on pin 3 (TD), requiring a crossed cable when connected to the standard DE-9M port of a PC. A&D’s FX-120i receives data on pin 3 (RD) and transmits it on pin 2 (TD). It requires a straight cable.
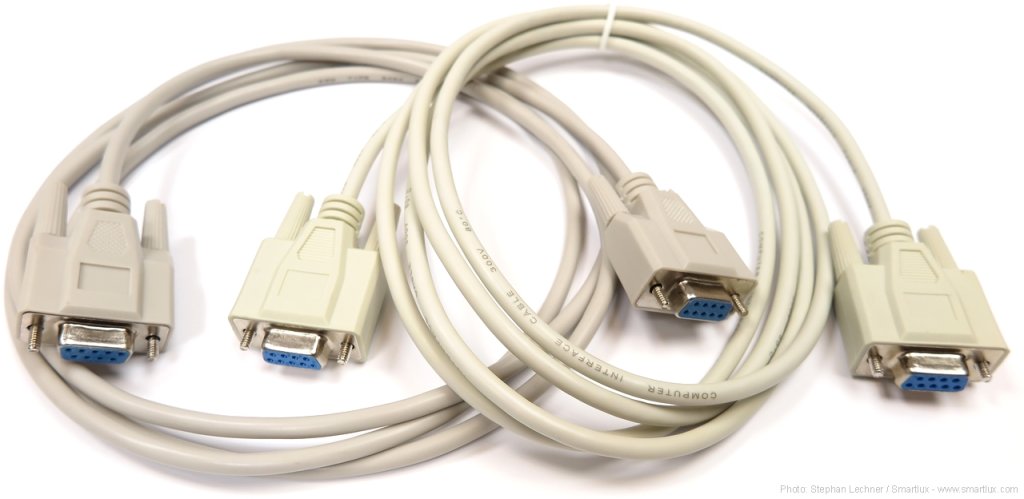
RS-232 cable terminology
Null modem cables are also known as crossover or crossed cables. They cross-connect certain pins, such as RD and TD.
Straight cables run straight through and are also called straight-through cables or 1:1 cables.
There are other types of serial cables, but these two are most common.
If you use the wrong type of cable, you connect TD to TD and RD to RD. This would lead to a situation like the one illustrated below, where both kids are holding the cans to their ears and no communication is possible:
Image generated by ChatGPT/DALL·E 3 (modified)
While we can immediately recognize that something is wrong in this picture, no one can tell a straight cable from a null modem cable just by looking at it:
Null modem cable and straight cable (or was it the other way around?)
Key takeaways: The fact that you can plug in a cable means nothing – it’s the pinout of your weighing instrument and the wiring of your cable that matters.
If the electrical connection between your scale and computer is not established correctly, it does not matter which software you use. It will not receive any data.
There are many more aspects of RS-232 communication to explore – we’ll do that in future articles. In the meantime, don’t hesitate to leave a comment, but please understand that I can’t remotely diagnose communication problems for free.
1Bidirectional communication on a single string is technically possible but doesn’t seem very practical.
2Did you notice that this schematic doesn’t tell you the gender of the port (DE-9M or DE-9F)? While it was just a simplified example, many actual user manuals omit this information as well, adding to the general confusion surrounding RS-232.
3Some scales and balances require connections between other pins. This is an advanced topic for a future article.
4RS-232 ports on scales come in many different forms and are not limited to DE-9M. You’ll frequently encounter DE-9F, DB25 (especially on older balances), RJ11, RJ45, and many others.
This will enable you to transfer the weight directly into a variety of applications as simulated keystrokes, such as Excel, a LIMS, or any other application of your choice. It even works with browser-based applications!
This guide can also be used for the very similar scales from the popular Ohaus Ranger 3000 series.
Ohaus Valor 7000 with 232key software
Video transcript
Introduction
This video will show you how to connect your Ohaus Valor 7000 scale to a PC and configure the 232key Virtual Keyboard Wedge software.
Connect the RS-232 cable to the scale
To prevent accidental overloading of the scale, remove the weighing pan and pan support. Then turn the scale upside down.
Open the compartment on the bottom. Connect the serial cable and secure it with the thumb screws.
Remove the cable breakaway tab
Before closing the compartment, break the middle tab on the cover. Turn the balance back over and put the weighing pan back in its place.
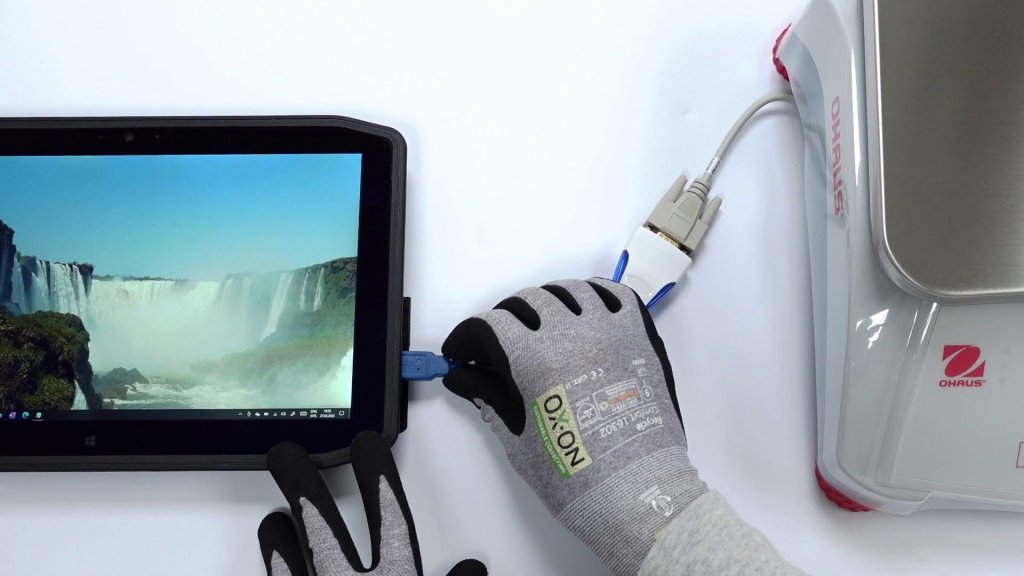
Connect the USB converter to the RS232 cable
Connect the USB converter to the other end of the cable and secure it with the thumb screws.
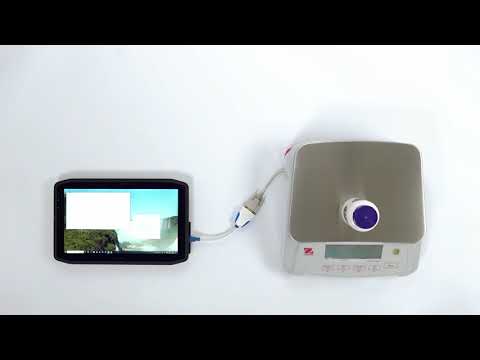
Connect the USB converter to your PC
Plug the converter into a USB port on your PC. The driver should install automatically. If not, see the video description for download links.
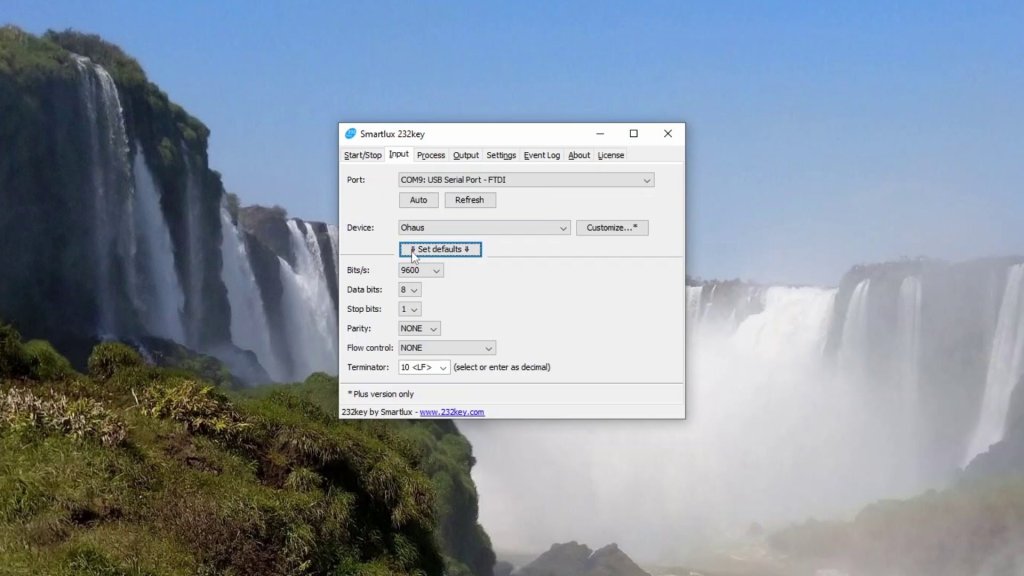
After the device is recognized by Windows, a new COM port will appear. You can find this port in the Windows Device Manager under “Ports (COM & LPT)”. In our case it is called COM9, but the number will probably be different on your system.
Set the “Device” to Ohaus and press the “Set defaults” button to set the serial interface parameters.
In the “Output” tab, select your keyboard type and, if necessary, a key that should be “pressed” after the weight is entered.
Go to the “Start” tab and press the “Start” button. 232key will now start listening for incoming data on the specified COM port and output it as simulated keystrokes.
Switch to the target application, e.g. Excel or a LIMS. For testing purposes we’ll just use Notepad.
Transfer the weight
Turn the scale on. Place an object on the weighing pan and press the PRINT button.
The weight is entered into the target application.
For more information, please visit our website at 232key.com.
The Ohaus Defender 3000 series scales with T32XW and T31P indicators can send the weight via the standard RS-232 interface. There are several ways to trigger data transmission:
By pressing the print button1 on the scale,
automatically at each stable weight,
continuously2 at a rate that depends on the baud rate (approx. 50 values/s with standard setting 9600 bit/s; 100 values/s with 19200 bit/s)3,
in intervals from 1 s to 3600 s,
on demand via the interface with a suitable command (bidirectional communication).
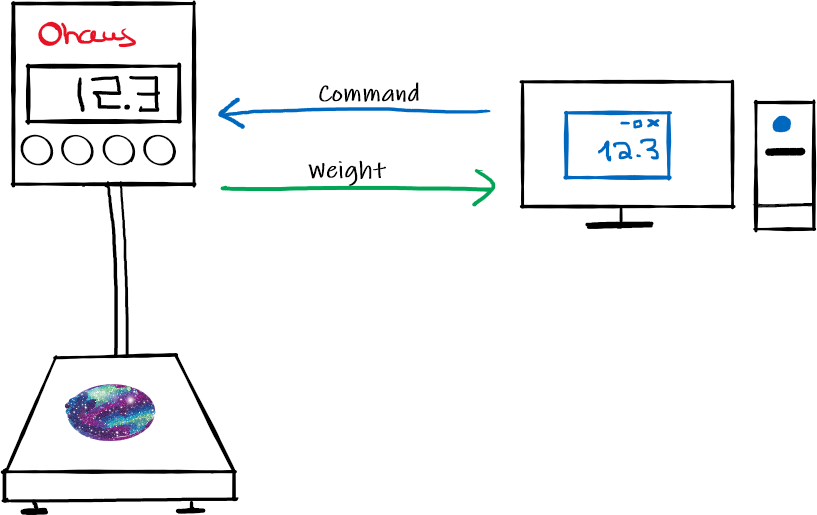
In this article I’ll describe the 5th method: a device connected to the balance via the RS-232 interface (e.g. a computer, microcontroller, PLC, etc.) sends a command to the balance and it responds with the weight:
Made by me with Microsoft Whiteboard, an application that fits my limited artistic talent
Notes: 1 Originally, scales were more often connected to printers than to computers, hence the name “Print”. 2 Continuous transmission (3) is not possible with verified (legal-for-trade) scales. 3 The actual measuring rate (conversion rate) is always approx. 16 values/s.
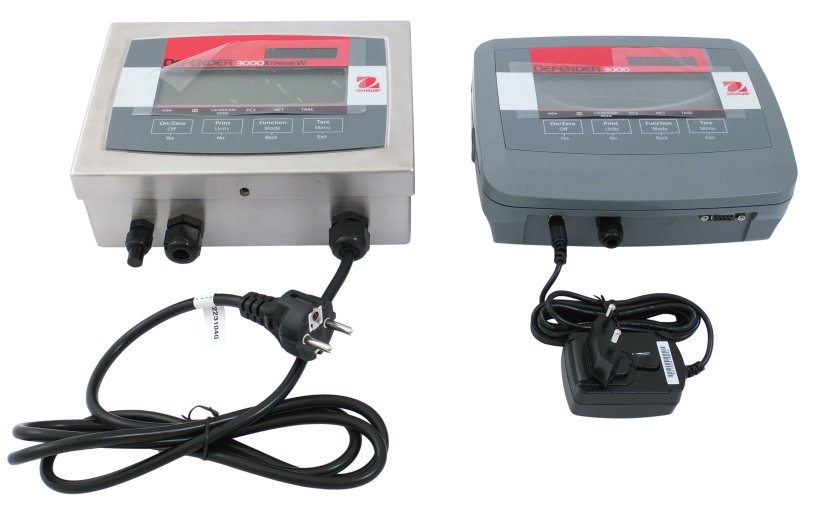
All explanations in this article refer to the current (October 2021) generation of the Ohaus Defender 3000 with the T32XW indicator with firmware 1.03 (left in photo above) and the T31P indicator with firmware 1.14 (right in photo).
Instruments with different firmware as well as older or possible future newer Defender 3000 models may behave differently. For verified (LFT) scales, some features are disabled (also, legal requirements must be observed when connecting verified scales to computers).
Commands to request the weight and data format of the response
To send commands to the scale and to view the reply, you can use any serial terminal software (I’ll be using HTerm). No settings need to be changed on the scale: by default, data transmission by pressing the print key (1) and requesting the weight via the interface (5) is supported.
Important: In HTerm, be sure to select “CR” or “CR-LF” in Send on Enter under Input Control so that all commands sent to the scale are terminated with these characters (required).
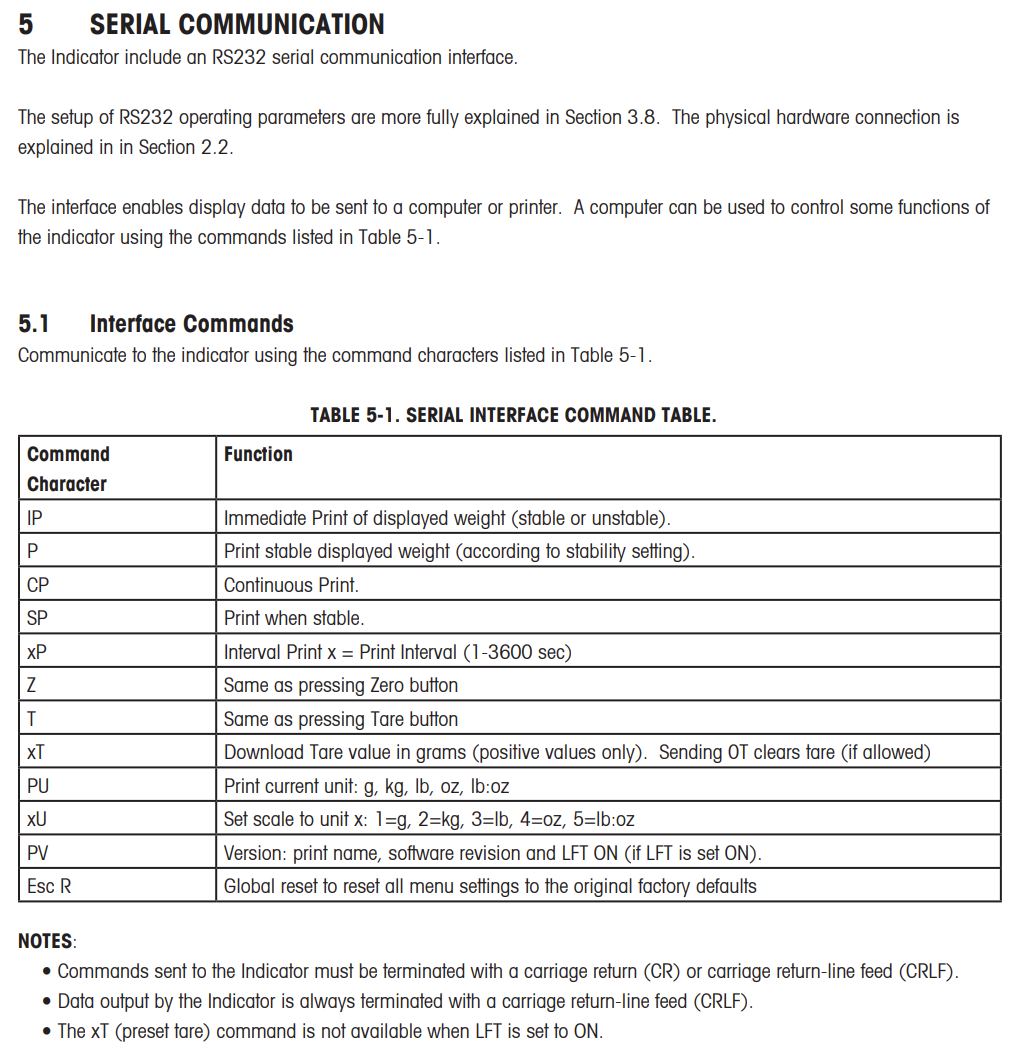
The following commands are listed in the user manual (PDF), I’ll discuss them in detail below:
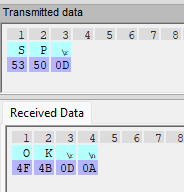
SP command (Print when stable) – does not work as expected
If the scale sent the weight as soon as it stabilized after receiving SP, this command would be very interesting. However, the Defender 3000 does something completely different: it sets the Print > Stable setting to “On” and responds with “OK”:
As far as I know, this setting cannot be changed back to “Off” with any command (except the Reset command). It must be changed directly on the indicator in the Print menu.
This command is unfortunately useless for retrieving the weight. On other scales, such as the Ohaus Defender 5000, it works as expected.
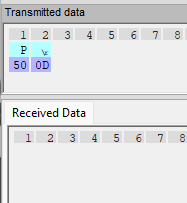
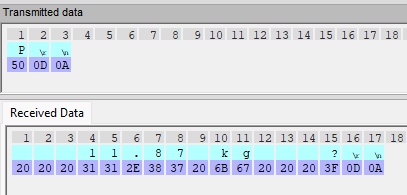
P command (Print)
The P command corresponds to pressing the Print button on the scale. Therefore, the already mentioned stability setting (Print > Stable) is observed:
Print > Stable: “On”
If Print > Stable is set to “On”, the weight is only sent if it is stable (an asterisk * appears in the upper left corner of the display when the weight is stable). If the scale receives the P command when the weight is unstable, it does not respond (and the display briefly shows “–NO–“):
Note: For verified scales, Print > Stable is always set to “On” and cannot be changed.
Print > Stable: “Off
If Print > Stable is set to “Off”, the scale always responds to P with the weight. Unstable weights are marked with a question mark (see below).
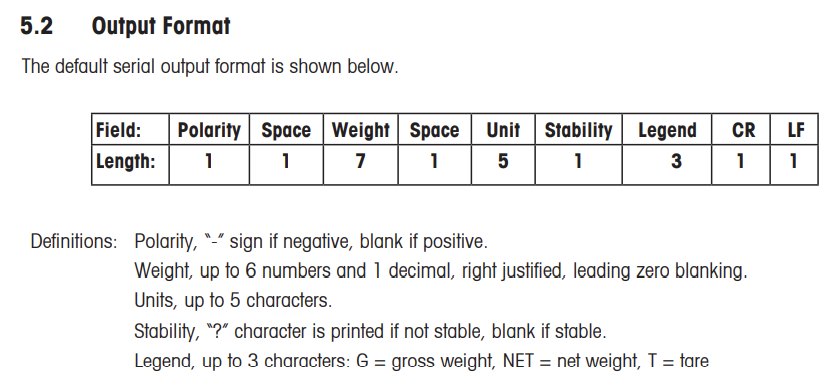
Output format of the scale when replying to the P command
The description in the manual is largely correct:
The 7 characters for the weight correspond to the 6 digits of the scale display plus the decimal point. The legend is only used for the gross, net and tare weight (deactivated by default) and is otherwise omitted.
Example 20.00 kg, stable:
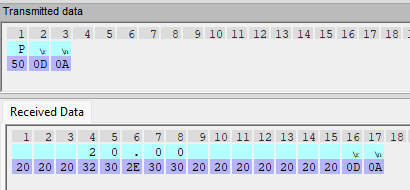
Example -3.18 kg , unstable:
Example 11,87 kg, unstable, with unit (Print > Content > Unit: “On”):
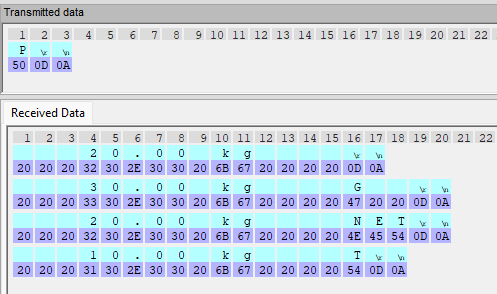
Example with gross, net and tare weight as well as unit (all entries in the Print > Content menu set to “On”), stable:
Note: The scale sends the lines with the net weight and the tare value only if the latter is not zero (i.e. if the tare function was actually used).
Same example as above, except that the tare value was set with “1000T” via the interface:
The only difference is “PT” (pretare) instead of “T” in the last line.
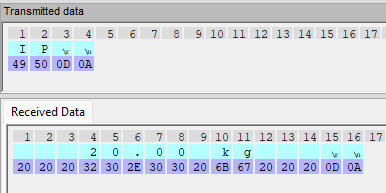
IP command (Immediate Print)
The IP command can be used only with non-verified scales. After receiving the IP command, the scale sends the weight immediately, whether it is stable or not. Moreover, the response is not influenced by settings in the scale’s menu, so Print>Stable and Print>Content do not play any role.
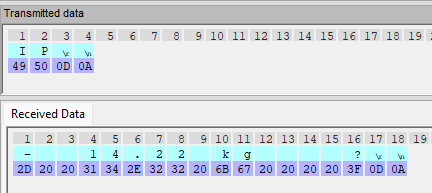
Output format of the scale when replying to the IP command
For a stable weight, the response consists of 16 characters:
If the weight is unstable, two characters are added (space and question mark at the end):
Other commands
CP (Continuous Print)
Activates the continuous transmission of the weight (possible only with non-verified scales), see point 3 at the beginning of this article. With 0P (zero + P) this can be deactivated again. The data format is similar to those described above.
Caution: The high data rate can overload some programs. In addition, the scale is sometimes falsely recognized as a serial mouse by Windows if it sends values continuously already at system startup (the mouse pointer then jumps wildly across the screen and your customer may call you and complain that your scale made his PC go crazy).
xP (Interval Print)
Transmission every x seconds (with x from 1 to 3600), send 0P to disable. The data format is the same as the P command.
Z (Zero)
For zeroing the scale, corresponds to pressing the Zero button on the indicator. The allowed range for executing the command is controlled by the Setup > Zero setting (2% or 100% of the capacity).
Note: The scale always responds with “OK”, even if the allowed range has been exceeded and the command could therefore not be executed (and the display showed “–NO–“).
Caution: If Setup > Zero is set to “0-100”, the maximum capacity could be unintentionally exceeded (as the zero range is not subtracted from the capacity).
Use the Z command to eliminate small residual values. It is not intended as an alternative to the tare command (see below).
T (Tare)
Same as pressing the Tare button. Suitable for “zeroing” the weight of a container or weighing individual components of a recipe.
The tare function can be deactivated by sending 0T (zero + T). The scale will then show the gross weight again instead of the net weight (only possible via this command, not via a button on the indicator). 0T is probably not supported by verified scales (I haven’t tried this out yet).
Note: If the tare function cannot be executed (because there is no object on the scale), the scale will still respond with “OK”, but will show “–NO–“in the display.
xT (Pre-tare)
Sets x as a pre-tare value, where x must be specified in g. Not possible with verified scales.
Example:
PU (Print Unit)
The scale responds with the currently used unit (without blank spaces, see example under xU).
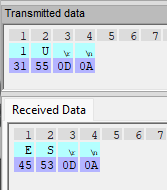
xU (Unit)
Changes the current unit, 1U=>g, 2U=>kg, 3U=>lb, 4U=>oz, 5U=>lb:oz.
Important: In order to set a unit, it must have been activated in the menu of the scale under Mode > Unit. Otherwise, the scale responds with “ES” instead of “OK”:
Verified scales may not support all units (this depends on your local regulations).
Example switching from kg to g:
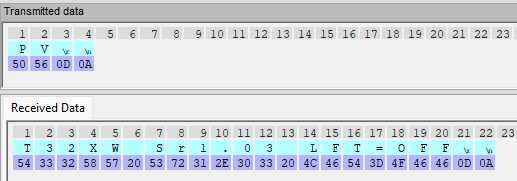
PV (Print Version)
The scale responds with the type of indicator (T32XW or “Defender 3000” for T31P), the firmware version (Sr=Software Release) and the “legal-for-trade” setting (“ON” for verified scales, “OFF” otherwise). With this command you can easily check if your scale uses the same firmware as my test unit.
Example T32XW:
Example T31P:
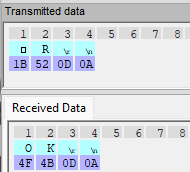
<ESC> R (Reset)
Resets all settings to the factory defaults. In my tests, some settings were only applied after a restart. I see no reason to use this command during normal operation (though – unlike on the Ranger 3000 and 4000 – it fortunately didn’t seem to reset anything in the CAL menu).
Example:
Summary of how to request the weight from an Ohaus Defender 3000 scale
The IP command is the simplest way to retrieve the weight (with the unit) from the Defender 3000. However, it cannot be used with verified scales.
Alternatively, the P command can be used, which is equivalent to pressing the Print button. It is influenced by the Print > Stable setting (send only stable values) and Print > Content setting (scope of transmitted data and unit).
SP is not a command to retrieve the weight, even if the description in the manual suggests this.
The format of the scale’s response differs slightly depending on the command (I don’t know why). I therefore recommended not reading a fixed position from the response string, but searching for the first number instead (which will be the weight).